OfficeJS Application Tutorial
This tutorial will teach you how to make a simple OfficeJS application from scratch, using only RenderJS and jIO.
To make the most of this tutorial, please take some time to brush up on your JavaScript basics, especially on promises.
Dependencies
- A gadget is an HTML page that can be rendered standalone or embedded in other gadgets, using RenderJS.
- In this chapter, you will create your very first gadget, to dynamically display those fateful words, "Hello, world!"
- Create a folder and add the files RenderJS, jIO, and Nexedi's fork of RSVP.js, which is required by the others.
- Save these files as
renderjs.js, jio.js, and rsvp.js respectively.
- Since this tutorial app is so simple, you'll be keeping all your files in this one folder, although you might create subfolders for larger apps.
Index Gadget HTML
- Save the following HTML as
index.html.
- Open up the details, or press the down arrow in slideshow mode, to see line-by-line comments about this code. This tutorial assumes that you have read every single one of these details, all in order!
<!doctype html>
<html>
  <head>
    <title>OfficeJS App</title>
    <script src="rsvp.js"></script>
    <script src="renderjs.js"></script>
    <script src="jio.js"></script>
    <script src="index.js"></script>
    <link href="index.css" rel="stylesheet">
  </head>
  <body>
    <h1>OfficeJS Application</h1>
    <p></p>
  </body>
</html>
- Lines 1–4: Generic HTML boilerplate.
- Lines 5–7: Load RSVP.js, RenderJS, and jIO sources. RSVP.js must be above both RenderJS and jIO, since they both depend on RSVP.js. Otherwise, the order does not matter. Each gadget should always have these lines to ensure that it can be loaded standalone.
- Line 8: Load the gadget script,
index.js, which contains all the logic for the gadget. It should be the last script, since it will depend on RenderJS and jIO.
- Line 9: Load the application stylesheet. Only the index gadget should have stylesheets in small apps, where the added complexity outweighs the flexibility and modularity of using stylesheets in subgadgets.
- Line 10–15: Generic boilerplate content. Notice the empty paragraph, which will shortly be rendered by RenderJS.
Index Gadget JavaScript
- Save the following stylesheet and JavaScript as
index.css and index.js, respectively. The stylesheet is only here to demonstrate that gadgets are just ordinary HTML files, which can also be styled with CSS.
h1 {
  color: red;
}
(function (window, rJS) {
  rJS(window)
    .declareService(function () {
      this.element.querySelector("p").textContent = "Hello, world!";
    })
}(window, rJS));
- Lines 1 and 6: The entire JavaScript file is wrapped in an immediately-invoked function expression, henceforth referred to as the IIFE, which is good JavaScript practice and not specific to RenderJS.
window and rJS are always required for a RenderJS app…
- Line 2: …because
rJS(window) is the RenderJS gadget itself, which must always be at the start of every gadget chain.
- Line 3: The
declareService() handler is triggered when the gadget is loaded in the DOM.
- Line 4: In all RenderJS methods,
this is rJS(window), which is the gadget itself. The DOM element on which the gadget is anchored is automatically stored as this.element. For example, if you have <div data-gadget-url="index.html"></div> in another page, then this.element would be that div.
- Since the whole page is the gadget, the gadget element in the DOM,
this.element, is actually the whole <body>. You can modify this.element however you wish, for example by using querySelector().
- Line 5: All RenderJS methods are chained together, so that the entire structure of a gadget looks something like
rJS(window).declareService().declareMethod().onEvent().onEvent() and so on. This gadget chain may look strange at first, but you'll quickly get used to it.
- One of the most common errors is forgetting to close the parenthesis—
})—in such a method, so remember to do so even after a function statement.
Hello, World!
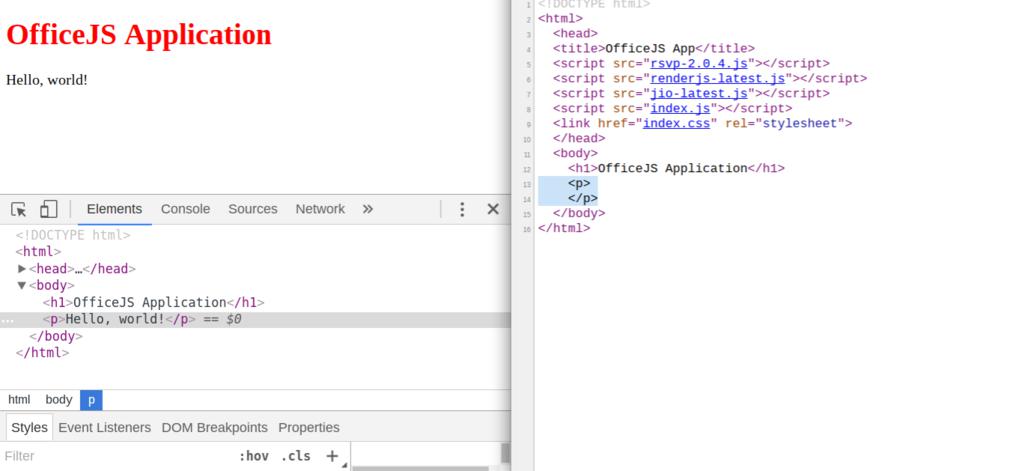
You've just made your first OfficeJS app!
Open index.html in a web browser to see it.
- Notice how
<p> is empty in the HTML source, but actually dynamically filled up with content due to RenderJS.
- This is because the function in the
declareService() handler triggered immediately when the gadget was loaded in the DOM.
- That function used
querySelector() on this.element, which is <body> for the index gadget, to insert text into the paragraph tag.
New HTML Elements
- Now that you have a minimal working example set up, in this chapter, you will get a glimpse into what RenderJS can really do.
- Gadgets, which are just HTML pages, can act as JavaScript objects, with their own properties and methods, when a RenderJS script like
index.js is included.
- Add the following code into
<body> in index.html to give us some new elements to play around with:
<form>
  <input type="text">
</form>
<ul>
</ul>
Event Listeners
- Replace the entirety of
index.js with the following code. Remember to always read all the details throughout the entire tutorial.
(function (window, document, rJS) {
  rJS(window)
    .declareService(function () {
      this.element.querySelector("p").textContent = "Hello, world!";
    })
    .declareMethod("addItem", function (item) {
      var list_item = document.createElement("LI");
      list_item.appendChild(document.createTextNode(item));
      this.element.querySelector("ul").appendChild(list_item);
    })
    .onEvent("submit", function (event) {
      var item = event.target.elements[0].value;
      event.target.elements[0].value = "";
      this.addItem(item);
    }, false, true);
}(window, document, rJS));
- Lines 1 and 17: Put
document in the local scope of the IIFE, since lines 8 and 9 reference it. This makes accessing global variables a tiny bit faster and helps you remember that they're actually global variables.
- Lines 6–10: Declare your first actual method, called
addItem(), which takes as input a string called item and appends it to the list.
- Line 11: Bind an event handler to
submit, in pretty much exactly the same way as this.element.addEventListener().
- Lines 12–13: Get and reset the input value, knowing that
event.target is the <form>, which has only one child.
- Line 14: This is the syntax for calling RenderJS methods on a gadget. Basically, they act just like normal JavaScript methods… for now.
- Line 15: These two optional boolean parameters to
onEvent() are useCapture and preventDefault respectively, the same as in addEventListener().
RenderJS In Action
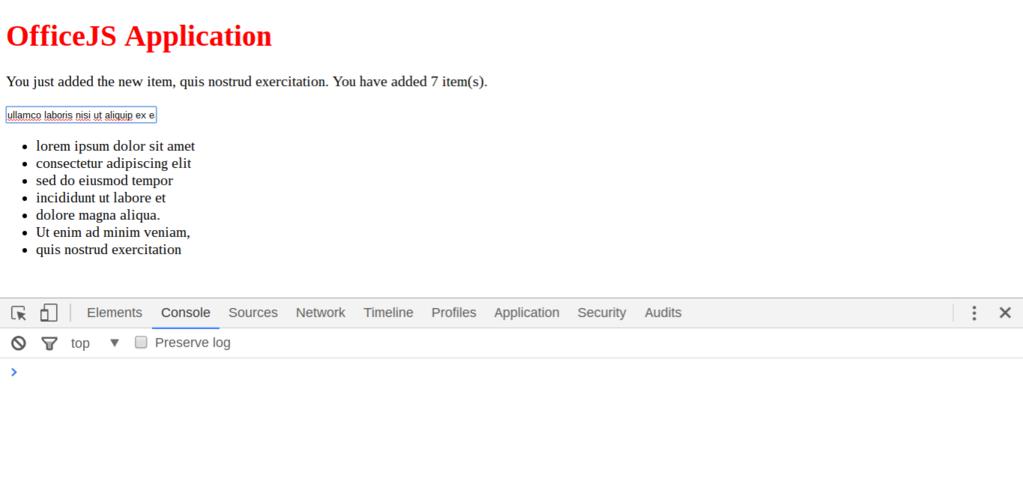
- Go to your app at
index.html, type something in the input, and submit the form by pressing Enter or Return. Watch the list grow.
- Remember to disable caching to ensure that your app always refreshes with the latest changes in the HTML.
- If all goes well, then congratulations, you've just seen your first custom gadget method in action!
New Gadget Methods
- You can add more methods by inserting them anywhere in the gadget chain.
- For example, imagine you have a gadget chain like so:
rJS(window).declareService().declareMethod().declareMethod().onEvent();
- Then, you can add another
.onEvent() method at the front, middle, or back:
rJS(window).onEvent().declareService().declareMethod().declareMethod().onEvent();rJS(window).declareService().declareMethod().onEvent().declareMethod().onEvent();rJS(window).declareService().declareMethod().declareMethod().onEvent().onEvent();- Practice adding a new method by inserting the following in
index.js wherever you like:
.onEvent("click", function (event) {
  this.element.querySelector("p").textContent =
    "You have just clicked on a " + event.target.tagName + " tag.";
}, false, true)
- Remember that
onEvent() is the same as this.element.addEventListener(), and this.element of the index gadget is <body>.
- Therefore, this event listener fires anywhere in the body tag.
- If you click outside the body tag, on the edges of the screen, then nothing will happen.
- Other gadgets'
onEvent() callbacks also trigger in their own element, which is usually their own <div> tag.
Gadget State
- Add these last two methods to
index.js; again, order does not matter.
.setState({
  item_list: [],
  current_item: null
})

.onStateChange(function (modification_dict) {
  if (modification_dict.hasOwnProperty("current_item")) {
    this.addItem(modification_dict.current_item);
  }
})
- Lines 1–4: Set the initial state of the gadget to
{item_list: [], current_item: null}.
- This is called automatically, as with
declareService(). The state itself is just a JavaScript object, state, and can store anything.
- Line 6: One of the main RenderJS methods is
changeState(). Calling changeState() will immediately trigger onStateChange().
- However, contrary to its name,
onStateChange() is not triggered if you manually change the state with state.key = value.
- So in order to stay sane, make sure you only change the gadget state using
changeState().
- Line 7: The parameter in
onStateChange() is a JavaScript object that contains all the properties in the state that have changed due to changeState(). Only reassignments, like current_item = item, count as changes; mutations of objects, like item_list.push(), do not.
- Line 8: This calls
addItem() if someone changes state.current_item using changeState().
State Changes
- In the
submit event listener, replace this.addItem(item); with this.changeState({current_item: item}); and refresh your app.
- Click around. Try to input the same thing twice in a row. What happens?
- The repeated input is not added to the list because
state.current_item does not change, so there is nothing in modification_dict and it does not call addItem().
- In summary,
onStateChange() is called if, and only if, changeState() is called and something in the state is reassigned.
A Bug In The State
- Even though
changeState() did not include item_list, you can still access item_list.length after, because changeState() does not overwrite the state, like with state = new_state.
- Instead,
changeState() only overwrites the properties that it is given, like with state.current_item = new_state.current_item.
- To remove a property from the state, pass
key: undefined with it.
RSVP
- RenderJS is asynchronous, using promises implemented by RSVP.js.
- However, instead of using
.then() to chain promises, Nexedi's custom version of RSVP.js adds a RSVP.Queue().
- These promise queues are just chains of promises that can be cancelled:
new RSVP.Queue().push(onFulfilled, onRejected).push(onFulfilled, onRejected) and so on.
- Gadget methods actually always return promise queues, which you can check by logging a call to
addItem().
- As a RenderJS method,
changeState() returns a promise queue too. To fix that bug, you'll be exploring all about promise queues in this chapter.
Chaining Promises
- Now, you should be wondering exactly when the promises in these queues are resolved.
- They're asynchronous, so they can resolve whenever they want, and there's no way for you to know!
- So it's possible that
this.element.querySelector("p").textContent is being set before the promise queue returned by this.changeState({current_item: item}); is resolved.
- How do you wait for a promise to resolve before doing something else? By chaining them, with
then().
- How do you wait for a promise queue to resolve before doing something else? By chaining them, with
push().
Asynchronization
- The first step is to replace the synchronous code in the
submit event listener with an asynchronous promise queue.
- In
index.js, add RSVP to the IIFE (the first and last lines).
- Replace the
submit event listener with the following JavaScript:
.onEvent("submit", function (event) {
var item = event.target.elements[0].value;
event.target.elements[0].value = "";
new RSVP.Queue()
.push(function () {
this.changeState({current_item: item});
})
.push(function () {
this.element.querySelector("p").textContent =
    "You just added the new item, " + this.state.current_item
    + ". You have added " + this.state.item_list.length + " item(s).";
});
}, false, true)
A Bug In The Queue
- Refresh your app and test the input. But nothing happens anymore.
- The only change to the event listener is that the last two lines are now wrapped in a promise queue, so that the contents of
<p> are only set after the state has changed.
- Since a
push() is analogous to a then(), perhaps the scope also changes in a promise queue, and this this is no longer this.
- Log
this inside and outside the queue and you'll find that they are indeed different.
- Rename
this to something arbitrary—the RenderJS convention is gadget—and assign var gadget = this; outside the queue.
A Bug In The Promise
- Refresh your app again. But the state is still not being updated correctly.
- On closer inspection, the code in the promise queue is exactly the same as it was outside; the queue calls
changeState() and then moves on, without actually waiting for it to be resolved.
- Just as in a promise chain, you have to
return a promise in a promise queue to wait for that promise to be resolved.
- Just calling a function that returns a promise does nothing.
- In short, add
return before gadget.changeState().
A Bug In Nothing?
- Refresh your app for the penultimate time. But everything works.
- Since all RenderJS methods return promise queues, your
submit function should too. In fact, all your gadget methods should have return new RSVP.Queue() at the end.
- But since all RenderJS methods return promise queues,
changeState() does too, something like return new RSVP.Queue().push().push().
- And since
changeState() already gives you a new RSVP.Queue() when you call it, you can directly chain promises onto it, with return gadget.changeState().push().push() and so on.
- The result is more compact, more readable, and identical in functionality to writing
return new RSVP.Queue().push(function () { return gadget.changeState(); }).push().push() and so on.
- The final result of
index.js is in the details.
/*jslint nomen: true, indent: 2, maxerr: 3, maxlen: 80*/
/*global window, document, rJS*/
(function (window, document, RSVP, rJS) {
  "use strict";
  rJS(window)
    .setState({
      item_list: [],
      current_item: null
    })
    .declareService(function () {
      this.element.querySelector("p").textContent = "Hello, world!";
    })
    .onStateChange(function (modification_dict) {
      if (modification_dict.hasOwnProperty("current_item")) {
        this.addItem(modification_dict.current_item);
      }
    })
    .declareMethod("addItem", function (item) {
      var list_item = document.createElement("LI");
      list_item.appendChild(document.createTextNode(item));
      this.element.querySelector("ul").appendChild(list_item);
      this.state.item_list.push(item);
    })
    .onEvent("submit", function (event) {
      var gadget = this,
        item = event.target.elements[0].value;
      event.target.elements[0].value = "";
      return gadget.changeState({current_item: item})
        .push(function () {
          gadget.element.querySelector("p").textContent =
            "You just added the new item, " + gadget.state.current_item
            + ". You have added " + gadget.state.item_list.length + " item(s).";
        });
    }, false, true)
    .onEvent("click", function (event) {
      this.element.querySelector("p").textContent =
        "You have just clicked on a " + event.target.tagName + " tag.";
    }, false, true);
}(window, document, RSVP, rJS));
A Bug Fixed
You now have a deeper understanding of the importance of using asynchronous promise queues everywhere in RenderJS.
Also, notice the directives for JSLint, which is used by all Nexedi developers. We also recommend that you use some code linter.
TodoMVC
- At this point, you have a completely useless app that simply adds items to a list. However, this tutorial is actually building up to a fully functional todo list, a TodoMVC application.
- You've already got a list, and now you need to save its contents.
- But before that, in this chapter, you will learn how to add a new subgadget to manage that storage.
Model Gadget HTML
- So far, you've been working with only one gadget, one HTML page, and one JavaScript file.
- The true power of RenderJS only shines through when leveraging the modularity and flexibility of multiple gadgets all mutually interacting.
- A gadget is an HTML page, so create the new file
gadget_model.html:
<!doctype html>
<html>
  <head>
    <title>Model Gadget</title>
    <script src="rsvp.js"></script>
    <script src="renderjs.js"></script>
    <script src="jio.js"></script>
    <script src="gadget_model.js"></script>
  </head>
  <body>
  </body>
</html>
Model Gadget JavaScript
(function (window, rJS) {
  rJS(window)
    .declareService(function () {
      console.log("Hello, world!");
    })
}(window, rJS));
- Compared to
index.html, this gadget has a different name, no stylesheet, and no body content, since a model gadget only needs to model information, and doesn't need to display anything.
- Nevertheless, this gadget still has all the JavaScript sources, because a RenderJS gadget should try to function standalone.
- Since this gadget has no DOM content to manipulate, you should log its birth to the console to show that it's loaded.
- Do so by creating the new file
gadget_model.js as well:
Declaring Gadgets In HTML
- To declare a new gadget inside an HTML document, simply add a
<div> with data-gadget-url set to the URL of the gadget.
data-gadget-scope is a unique identifier for the declared gadget.- If
data-gadget-sandbox is public, then the gadget is inserted in the DOM, so that everything in its <body> is copied into that <div>.
- If
data-gadget-sandbox is iframe, then it is put in an inline frame.
- Since your new gadget's URL is
gadget_model.html, you can add the following snippet anywhere in the body of index.html:
<div data-gadget-url="gadget_model.html"
  data-gadget-scope="model"
  data-gadget-sandbox="public">
</div>
Unhandled Error
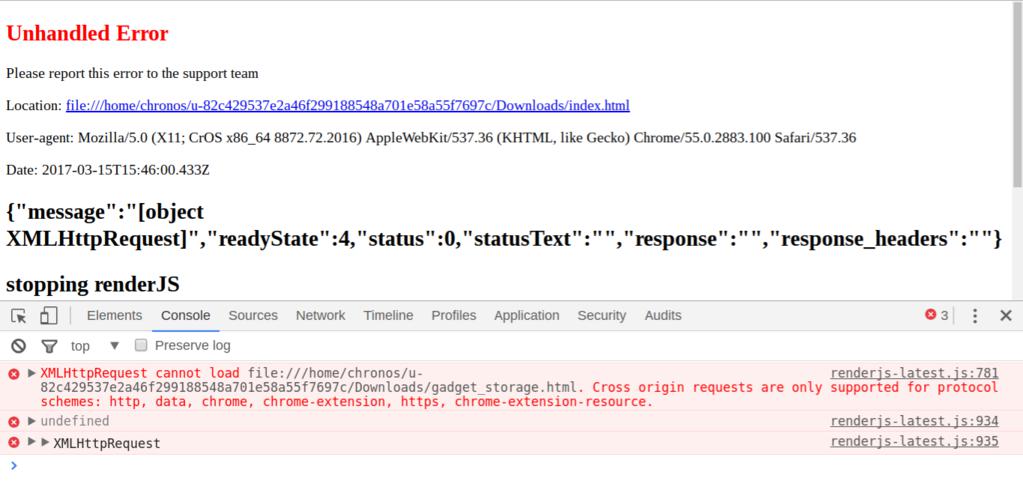
- Refresh your app by opening
index.html as usual.
- If you're lucky, you should see "Hello, world!" in the console, proving that the model gadget loaded successfully.
- If you're not, then you should see "Unhandled Error" in big red letters.
Cross-Origin Requests
- RenderJS uses
XMLHttpRequests to load other gadgets like gadget_model.html. However, modern web browsers block these sorts of requests on the local filesystem for security.
- To continue, you have to either disable this feature in your browser or set up your own web server.
- Many solutions have been offered on Stack Overflow, and we will give you a step-by-step guide through the most convenient one that doesn't compromise security.
- Feel free to try other options, or just install Python and follow along.
Python HTTP Server
- Open up a terminal or shell or console that has Python installed.
- Change into the folder that contains
index.html and your app.
- Run
python -m SimpleHTTPServer with Python 2 or python -m http.server with Python 3.
- Navigate to http://localhost:8000 on your web browser.
- Congratulations! You've just declared your first subgadget.
jIO Documents
- jIO is a promise-based storage framework, inspired by CouchDB and based on its API.
- A jIO storage only stores documents, which are JSON objects that can contain anything.
- The properties of these documents are often treated as metadata, because documents also contain attachments, which are binary blobs that store the actual content you would expect inside a "document".
- In this chapter, you will learn about the basic I/O operations of jIO.
jIO CreateJIO
- Replace
gadget_model.js with the following. Remember to check the details.
/*jslint nomen: true, indent: 2, maxerr: 3, maxlen: 80*/
/*global window, RSVP, rJS, jIO*/
(function (window, RSVP, rJS, jIO) {
  "use strict";
  rJS(window)
    .declareService(function () {
      return this.changeState({storage: jIO.createJIO({
        type: "indexeddb",
        database: "todos-renderjs"
      })});
    })
    .declareMethod("put", function () {
      return this.state.storage.put.apply(storage, arguments);
    })
    .declareMethod("get", function () {
      return this.state.storage.get.apply(storage, arguments);
    })
    .declareMethod("allDocs", function () {
      return this.state.storage.allDocs.apply(storage, arguments);
    });
}(window, RSVP, rJS, jIO));
- Line 7: This is the jIO constructor, which creates a jIO storage using a JavaScript object as parameters and assigns it to
this.state.storage.
- Although all other jIO methods are asynchronous and must be called in promise queues,
createJIO is synchronous, so you can directly use it in the modification dict.
- Since this is arbitrarily different, hopefully it will become asynchronous someday.
- Lines 8 and 9: IndexedDB is the most simple type of storage that supports all jIO features, so try that storage configuration first.
- Lines 12–20: These methods simply call the corresponding method of the jIO storage, so that other gadgets don't directly access the state of the model gadget.
jIO Put
- A jIO storage has nine methods to access documents in its storage.
- The simplest is
put(), which stores the given document of the given ID in the jIO storage, as put(id, document).
- Replace
declareService() in index.js with the following:
.declareService(function () {
  var model_gadget;
  return this.getDeclaredGadget("model")
    .push(function (subgadget) {
      model_gadget = subgadget;
      return model_gadget.put("/", {
        title: "Test",
        completed: false
      });
    });
})
- Line 3: Remember
data-gadget-scope? This is where it is used. To access the methods and state of a subgadget, the parent gadget can call getDeclaredGadget() and pass in the child gadget's scope.
- Line 4:
getDeclaredGadget() returns the child gadget itself. Just like in a promise chain, the resolved value of the previous promise is passed into the parameters of the next promise in a promise queue. Putting this together, the result is that anything the model gadget can do with this, the parent gadget can now do with model_gadget!
- Line 5: Instead of having to call
getDeclaredGadget() every time you need to use a child gadget, you can just assign the result of one call to model_gadget in line 2, outside the promise queue, to use it everywhere inside
- When you want to save some variable from one queue push to another, this is the way to do it, by declaring it outside the entire promise queue.
- Line 6: Calling
model_gadget.put() here is exactly the same as calling this.put() inside model_gadget.js.
- Lines 7–9: This puts the document
{title: "Test", completed: false} inside the jIO storage with a hard-coded ID of "/".
Inspecting Storages
- If you do not see the IndexedDB database, and especially if you see an error, perhaps your browser does not support IndexedDB.
- In that case, pass the following configuration to
createJIO() instead:
.declareService(function () {
  return this.changeState({storage: jIO.createJIO({
    type: "document",
    document_id: "/",
    sub_storage: {
      type: "local"
    }
  })});
})
- Now, try to inspect the local storage in Chrome, Firefox, or another browser (in which case instructions must be searched for by yourself).
- If you see keys beginning with "document", then you've also successfully integrated jIO with RenderJS.
- This configuration is a little more involved than with the IndexedDB storage.
- Instead of a single jIO storage connector, this configuration specifies a DocumentStorage handler on top of a LocalStorage connector.
- jIO storage connectors such as IndexedDB, Dropbox, WebDAV, or LocalStorage directly store documents and attachments.
- In particular, LocalStorage can only access a single document, with the id
"/", which represents the local storage of your browser.
- This means that you cannot use
put() to put more documents in it.
- Unlike storage connectors, jIO storage handlers do not store anything.
- However, they can manipulate documents and attachments in substorages.
- So by adding a DocumentStorage handler on top of LocalStorage, you can use
put() directly on the DocumentStorage, which automatically puts an attachment on the document with ID document_id in its sub_storage, the LocalStorage.
- The power of jIO is that regardless of which connector, which handler, or which handler on which connector in a storage tree of whatever complexity, the same nine methods always apply to all of them, eliminating all the wasted development time on interfacing with all these APIs.
- Refresh your app. Although nothing happens, behind the scenes, jIO hopefully did save your document somewhere.
- Try to inspect the IndexedDB in Chrome, Firefox, or another browser (in which case instructions must be searched for by yourself).
- If you see a "jio:todos-renderjs", then you've just successfully integrated jIO with RenderJS.
- Otherwise, see the details to set up an alternative storage configuration.
- The full list of configuration formats is available at API - Storage Types.
jIO in Action
- Now that everyone has a working jIO storage, it's time to
put() in some actual user-generated data.
- Replace
onStateChange() in index.js with the following:
.onStateChange(function (modification_dict) {
  if (modification_dict.hasOwnProperty("current_item")) {
    this.addItem(modification_dict.current_item);
    return this.getDeclaredGadget("model")
      .push(function (model_gadget) {
        return model_gadget.put(gadget.state.item_list.length.toString(), {
          title: modification_dict.current_item,
          completed: false
        });
      });
  }
})
- Lines 4–10: This is pretty much the same as the code you first put in
declareService().
- Line 6: IDs must be unique in all jIO storages, but fortunately, since items cannot be deleted, you can use the strictly increasing length of
item_list to give each new item a unique string ID, right?
- Well, consider what happens if you have multiple
item_lists in different tabs.
- Hint: it's not good, but jIO has a handler to handle it, which you'll see much later.
jIO Get
- The real goal of storing all our todos in some storage is to be able to retrieve them all on initial page load—in
declareService().
- But you don't know the IDs of your todos in
declareService(), so you can't get() them.
- You do know that the IDs are strictly increasing natural numbers starting from
0, so some of you may have the bright idea of storing the current length of item_list length with a hard-coded ID, retrieving it, and then calling get() on all numbers up to that length.
- However, this custom assignment of IDs is not thread-safe, when you consider the possibility of modifying the same todo list in multiple tabs.
- So you need a better way of finding these IDs.
jIO AllDocs
- Thankfully, jIO has a method to get the IDs of all documents in storage.
- In
index.js, delete the put(), get(), and console.log(), then append the following instead:
.push(function () {
  return model_gadget.allDocs();
})
.push(function (result_list) {
  var promise_list = [], i;
  for (i = 0; i < result_list.data.total_rows; i += 1) {
    promise_list.push(model_gadget.get(result_list.data.rows[i].id));
  }
  return RSVP.all(promise_list);
})
.push(function (result_list) {
  var i;
  for (i = 0; i < result_list.length; i += 1) {
    gadget.addItem(result_list[i].title);
  }
});
- Line 2: Like all jIO methods,
allDocs is self-explanatory: it returns a list of every ID.
- Line 4:
allDocs() returns a curious object: {data: {rows: [doc, doc, ..., doc], total_rows: 42}}, where each doc contains a key, id, for its ID.
- Line 5: You have to retrieve all these documents by passing their IDs to
get(), but all jIO methods, except for createJIO(), are asynchronous.
- You know how to wait for the resolved value of a single promise, by returning it in a promise queue and catching its result in the next promise, but waiting for a list of promises to all resolve requires… a list of promises.
promise_list is the list that stores all the promises you need to wait for.- Lines 6–8: Since
get() returns a promise queue, you can call it for every document in the jIO storage to get them all, then push the resulting unresolved queues into promise_list.
- Line 9: The way to wait for some promises to all resolve is to
return RSVP.all().
- Line 11: If all promises in the given list do resolve, then
RSVP.all() returns a list containing, for each promise, its resolved value.
- If any promise in the given list is rejected, then
RSVP.all() throws the first rejection.
- Lines 13–15: The list of results of
get() is simply a list of documents, whose titles can now be added to the list.
- Refresh your app, clear your IndexedDB, clear your local storage, clear everything, then refresh your app again, and add some witty todos.
- Then refresh your app again, admire your own eloquence as your todos persist from before the reload, close your browser, open your browser, then refresh your app again, and see your todos once more.
- Hooray! Your todo app is now fully persistent.
RenderJS Methods
- At this point, you're exactly halfway through the tutorial.
- You already know everything there is to know about making a complete OfficeJS app, with DOM manipulation, event binding, subgadgets, and now document storage too.
- If you're anything like me and never finish anything you want to do, then the todo app is already complete!
- But both RenderJS and jIO offer so much more.
- If you've ever skimmed through the RenderJS documentation, you may have gotten confused by the difference between
setState(), ready(), declareService(), declareJob(), and onEvent().
- In this chapter, you will learn about the proper usage of each of them.
RenderJS DeclareService
- Let's first explore the difference between
ready() and declareService().
- Replace
declareService() in gadget_model.js with the following, which introduces a ten second delay before creating the jIO storage.
.declareService(function () {
  var gadget = this;
  return new RSVP.Queue()
    .push(function () {
      return RSVP.delay(10000);
    })
    .push(function () {
      return gadget.changeState({storage: jIO.createJIO({
        type: "document",
        document_id: "/",
        sub_storage: {
          type: "local"
        }
      })});
    });
})
- When you refresh the page, you'll realize that there has been a race condition sleeping in your code the entire time.
- If
declareService() in index.js reaches model_gadget.allDocs() before declareService() in gadget_model.js reaches jIO.createJIO(), then there is no storage to allDocs() from!
- In the index gadget, you need to somehow wait for the model gadget to finish initializing before doing anything else. Alternatively, in the model gadget, you need to somehow tell the index gadget to wait for you to finish your initialization before doing anything else.
- That is exactly what the
ready() handler is for. Replace declareService in gadget_model.js with ready(), and the error disappears. After ten seconds, your todo list will also load correctly.
RenderJS Ready
- The
ready() handler blocks everything else.
- A gadget with a
ready() handler must wait until all the code in ready() is executed—for a promise queue, that means that the last promise in the queue is resolved—before doing anything else, which ensures that the gadget is "ready" for the rest of its functions.
- In particular,
declareService(), onEvent(), and everything else only runs after ready(), so no event listeners are declared while ready() is running.
- If you try to add a new todo during those 10 seconds of delay in the model gadget, you'll be redirected to
/? because there are no event listeners on the input, so it devolves into acting as a basic HTML form.
- A parent gadget that contains a subgadget with a
ready() handler must also wait, which ensures that the subgadget is "ready" for anything the parent wants to do. This has some interesting implications.
- A gadget with
ready() blocks itself and its parent, and its parent blocks its parent's parent.
- Therefore, literally every gadget in the chain of declared subgadgets must wait for all their
ready() handlers to finish executing before doing anything else.
- Using
ready() makes your code synchronous, so here are some guidelines:
- Only use
ready() when you really need to wait. For example, creating the jIO storage must be done first, because other functions depend on it. Something like synchronizing storages is not as critical.
- Keep everything in one
ready() handler. You can have many of them, but they just execute one after another in the order that they're declared, which is the sole exception where RenderJS method order actually matters. Having only one ready() will get rid of all this confusion and make you think carefully about the necessity of every line you put in.
- Never access other gadget methods from
ready(). It is tempting to call a manual gadget initialization method, such as render(), but ready() blocks, so all your parent gadgets must now wait even longer. Try to initialize in declareService() handlers as much as possible.
- All in all, these are just guidelines; you can put almost anything in
ready(), and minimizing the code you put in merely decreases the synchronous delay for other gadgets.
- Nevertheless, there is one kind of code that you should never put in.
- Since
ready() is immediately called when the gadget is in memory, before it is rendered in the DOM, you cannot put any code that uses the DOM in ready(), including all event binding, for example.
- Small gadgets are often rendered faster than
ready() is executed, so that you won't see any explicit errors at first, but it's still a race condition as bad as using declareService() in your model gadget.
- To avoid this, again, use
declareService() instead of ready().
declareService() is called only when the entire gadget is rendered on the DOM, freeing you to bind events without fearing that something does not exist.
RenderJS OnEvent
- Of course,
declareService() is not limited to event binding, but that's just the most common use case, especially for small apps.
- Originally, RenderJS only had
ready() and declareService().
- However, Nexedi engineers often found themselves writing the same functions over and over again for common use cases such as updating a gadget's state or listening to events with a never-ending promise queue.
- Since the code to promisify event listening was several lines long and copied around everywhere, it was eventually exported as
onEvent().
- Under the hood,
onEvent() is just an event listener in declareService() bound to this.element, so everything you know about declareService()—that it runs after ready() and after the gadget element is loaded in the DOM—applies to onEvent() as well.
.declareService(function () {
  var gadget = this;
  return loopEventListener(document, "click", false,
    function (event) {
      gadget.element.querySelector("p").textContent =
        "You have just clicked on a " + event.target.tagName + " tag.";
    });
}, false)
- Since
onEvent() is bound to the gadget element, events that don't reach this.element cannot be caught using onEvent().
- That's where
declareService() can still be used.
- To reproduce the RenderJS implementation of
onEvent(), replace the click event listener in index.js with:
- Still in
index.js, now copy the following somewhere between "use strict"; and rJS(window):
function loopEventListener(target, type, useCapture, callback,
  prevent_default) {
  //////////////////////////
  // Infinite event listener (promise is never resolved)
  // eventListener is removed when promise is cancelled/rejected
  //////////////////////////
  var handle_event_callback,
    callback_promise;

  if (prevent_default === undefined) {
    prevent_default = true;
  }

  function cancelResolver() {
    if ((callback_promise !== undefined) &&
        (typeof callback_promise.cancel === "function")) {
      callback_promise.cancel();
    }
  }

  function canceller() {
    if (handle_event_callback !== undefined) {
      target.removeEventListener(type, handle_event_callback, useCapture);
    }
    cancelResolver();
  }
  function itsANonResolvableTrap(resolve, reject) {
    var result;
    handle_event_callback = function (evt) {
      if (prevent_default) {
        evt.stopPropagation();
        evt.preventDefault();
      }

      cancelResolver();

      try {
        result = callback(evt);
      } catch (e) {
        result = RSVP.reject(e);
      }

      callback_promise = result;
      new RSVP.Queue()
        .push(function () {
          return result;
        })
        .push(undefined, function (error) {
          if (!(error instanceof RSVP.CancellationError)) {
            canceller();
            reject(error);
          }
        });
    };

    target.addEventListener(type, handle_event_callback, useCapture);
  }
  return new RSVP.Promise(itsANonResolvableTrap, canceller);
}
- Refresh your app and click the far right or very bottom.
- Before, the click would not register, because the event listener was only bound to the gadget element,
<body>.
- Now, the event listener is bound to
document, so you can click anywhere on the entire document and it still captures the events.
RenderJS DeclareJob
- The latest addition to RenderJS is
declareJob(), which is basically a declareService() that is triggered by being called, rather than automatically triggered when the gadget loads in the DOM.
- Unlike a service, a job can be triggered multiple times, and doing so will cancel the last call of the job if it hasn't finished.
- This could be useful if you want to "fork" a promise queue.
- Since each promise in a promise queue has to wait for the previous one, and each call of a RenderJS method must wait for the returned promise queue, so it might be useful to split a promise off of the promise queue.
- Now, please undo all of the changes you made in this chapter. They were meant purely to illustrate the inner workings of RenderJS methods. Don't worry, the rest of the changes in this chapter are actual changes!
- The specific use case that
declareJob() was developed for was inside a page that waits for all its gadgets to load before displaying any content.
- Within the page, a table gadget often takes seconds to fetch data from a central database, which slows down the entire user experience.
- By using
declareJob(), the loading of that specific gadget is forked.
- This makes the page display some content as soon as all its other gadgets load, and only fully render the table gadget afterwards when the job is completed.
- Furthermore, if the table is queried and must fetch some other data instead, then the new job cancels the previous job, since there's no point rendering a gadget right before it is rendered anew by a newer job.
- These intricacies make jobs less intuitive than the other RenderJS methods, so please carefully consider other options before using
declareJob().
- Nexedi's modification of RSVP.js added support for cancelling promise queues.
- Cancellation is a very advanced topic and almost always limited to RenderJS's internal implementation; nevertheless, you may still run into some issues with it.
- In
declareService(), the promise queue returned by it will be cancelled when the gadget is removed from the DOM, which could be useful to remove event listeners and such.
- In
declareJob(), the promise queue returned by it will be cancelled when the job is triggered again, which could be useful to avoid unnecessary work.
- In
onEvent(), the promise queue returned by it will be cancelled when the same event is fired again, which could be useful to avoid duplicating responses.
RenderJS State
- Each gadget has its own
state object, that can be directly manipulated as this.state or less directly manipulated with changeState(), which then automatically triggers onStateChange().
- A new
onStateChange() is triggered every time changeState() is called, and they are all executed in order, so if you call RSVP.delay(300000), then RenderJS will block the next onStateChange() for five minutes.
- As for
setState(), it is simply the first ready() handler, run before anything else and blocking everything else.
setState({key: value}) is implemented as ready(function () { this.state = JSON.parse(JSON.stringify({key: value})) }).- To increase rendering performance, RenderJS strongly endorses the use of a virtual DOM, inspired by React, and
onStateChange() helps with something similar.
- You can emulate React's workflow by keeping all DOM modification code inside
onStateChange() and all rendering properties inside state.
- The following eleven steps only modify
index.js.
- First, add
current_tag as a new property in setState().
- This will keep track of
event.target.tagName from the click event listener.
- Second, replace the
click event listener with the following:
.onEvent("click", function (event) {
  return this.changeState({current_tag: event.target.tagName});
}, false, true)
- Third, in
onStateChange, add the following above the big if statement:
if (modification_dict.hasOwnProperty("current_tag")) {
  this.element.querySelector("p").textContent =
    "You have just clicked on a " + this.state.current_tag + " tag.";
}
- This should duplicate all previous functionality, but refresh your app to confirm.
- Fourth, add something very similar inside the big
if statement:
this.element.querySelector("p").textContent =
  "You just added the new item, " + gadget.state.current_item
  + ". You have added " + gadget.state.item_list.length + " item(s).";
- Fifth, replace the
submit event listener with the following:
.onEvent("submit", function (event) {
  var item = event.target.elements[0].value;
  event.target.elements[0].value = "";
  return this.changeState({current_item: item});
}, false, true)
- Now, almost all the DOM modifications have been isolated in
onStateChange().
- The only content remaining is the only content that takes any time to render, the todo list.
- Individually running
createElement and appendChild is incredibly slow, compared to calculating the raw HTML and changing innerHTML.
- More importantly, going back to the multiple tabs conflict again,
appendChild cannot reflect any changes in the database made by other clients.
- Tenth, rewrite
addItem() entirely as:
.declareMethod("addItem", function (item) {
var gadget = this;
gadget.state.item_list.push(item);
return gadget.getDeclaredGadget("model")
.push(function (model_gadget) {
return model_gadget.put(gadget.state.item_list.length.toString(), {
title: item,
completed: false
});
})
.push(function () {
return gadget.changeState({update: true});
});
})
- Since
put() is now in addItem(), you don't want to put() again all the documents you got from allDocs(), nor do you want to run onStateChange() for every todo you retrieve from storage at the beginning.
- Eleventh, replace the last
push() in declareService() with:
.push(function (result_list) {
var i;
for (i = 0; i < result_list.length; i += 1) {
gadget.state.item_list.push(result_list[i].title);
}
return gadget.changeState({update: true});
});
- Finally, remove
current_item from everywhere.
- Remove those
querySelectors too, remove the click event listener, and even remove current_tag, which was just introduced in this chapter.
- You're going to make a real todo app in the next chapter, and you won't need any of this.
onStateChange() should look like this by the end:
.onStateChange(function (modification_dict) {
this.element.querySelector("ul").innerHTML =
  "<li>" + this.state.item_list.join("</li>\n<li>") + "</li>";
this.state.update = false;
})
Graduation
Perhaps you've noticed a gradual decline in the depth of explanation in this chapter. That is intentional, because you are now already a fully qualified OfficeJS developer who can think on your own.
Therefore, after the next chapter (which involves lots of copying and pasting), the rest of the tutorial will only contain small snippets of code that you must integrate yourself.
Nevertheless, a reference implementation of this OfficeJS todo app will be available for download in a compressed format at the very end of the tutorial, for your own reference.
TodoMVC Stylesheets
- After all that RenderJS, it's time for a little break. In this chapter, you will set up the basic HTML and CSS styles for your TodoMVC app.
- For the CSS style, delete
index.css from your folder and download the latest versions of TodoMVC's base and application CSS files instead, base.css and index.css.
TodoMVC HTML
- For the HTML style, replace everything in
index.html with the following:
<!doctype html>
<html>
<head>
<meta charset="utf-8">
<meta name="viewport" content="width=device-width, initial-scale=1">
<title>OfficeJS App</title>
<script src="rsvp.js"></script>
<script src="renderjs.js"></script>
<script src="jio.js"></script>
<script src="index.js"></script>
<link href="base.css" rel="stylesheet">
<link href="index.css" rel="stylesheet">
</head>
<body>
<div data-gadget-url="gadget_model.html"
data-gadget-scope="model"
data-gadget-sandbox="public">
</div>
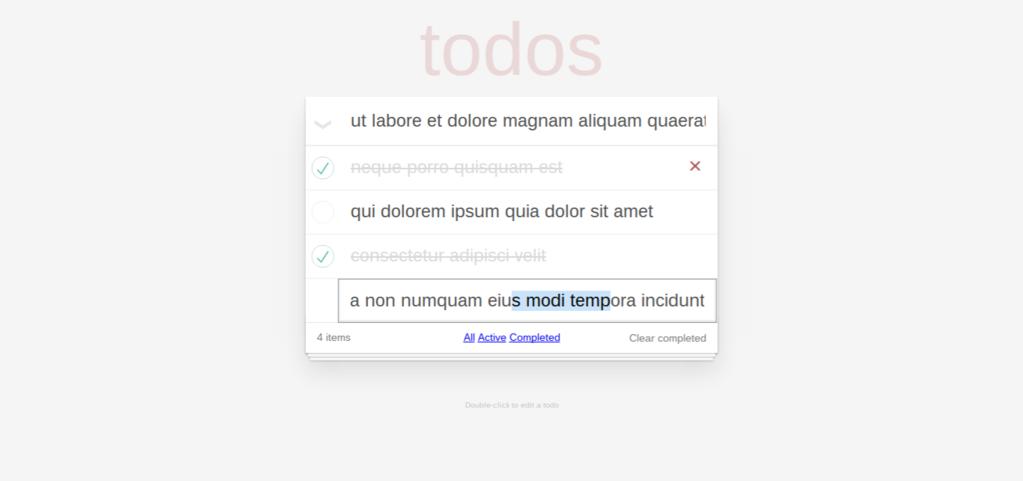
<section class="todoapp">
<header class="header">
<h1>todos</h1>
<form>
<input class="new-todo" placeholder="What needs to be done?" autofocus>
</form>
</header>
<section class="main">
<input class="toggle-all" type="checkbox">
<label for="toggle-all" class="toggle-label">Mark all as complete</label>
<ul class="todo-list"></ul>
</section>
<footer class="footer">
<span class="todo-count"></span>
<div class="filters">
<a href="#/" class="selected">All</a>
<a href="#/active">Active</a>
<a href="#/completed">Completed</a>
</div>
<button class="clear-completed">Clear completed</button>
</footer>
</section>
</section>
<footer class="info">
<p>Double-click to edit a todo</p>
</footer>
</body>
</html>
TodoMVC Specifications
- Everything in the TodoMVC HTML is pretty much self-explanatory.
<meta charset="utf-8"> is needed to correctly render a certain Unicode arrow in index.css.<meta name="viewport"> makes your app responsive on mobile.- The TodoMVC app specs dictate several miscellaneous things you ought to add for the full TodoMVC user experience.
- For example,
<section class="main"> and <footer class="footer"> should be hidden if there are no todos.
- In an earlier age, you might have simply put
this.element.querySelector(".main").style.display = "none" at the top of declareService()…
- Another TodoMVC requirement is that all todos be trimmed and empty todos rejected.
- Do so by replacing the
submit event listener with the following:
.onEvent("submit", function (event) {
    var item = event.target.elements[0].value.trim();
    event.target.elements[0].value = "";
    if (item) {
      return this.addItem(item);
    }
  }, false, true)
TodoMVC List Items
- Finally, instead of a simple
<li>content</li>, TodoMVC wants this:
<li class="todo-item">
  <div class="view">
    <input class="toggle" type="checkbox">
    <label class="todo-label">content</label>
    <button class="destroy"></button>
  </div>
  <input class="edit">
</li>
- To do that, you have two options.
- The first option is to create the element with pure HTML, just as you did before with the simple element. For example:
var todo_html_start = "<li class='todo-item'>\n"
    + "  <div class='view'>\n"
    + "    <input class='toggle' type='checkbox'>\n"
    + "    <label class='todo-label'>\n",
  todo_html_end = "    </label>\n"
    + "    <button class='destroy'></button>\n"
    + "  </div>\n"
    + "  <input class='edit'>\n"
    + "</li>";
this.element.querySelector("ul").innerHTML =
  todo_html_start + this.state.item_list
    .join(todo_html_end + todo_html_start) + todo_html_end;
Handlebars
<script class="handlebars-template" type="text/x-handlebars-template">
  <section class="todoapp">
    <header class="header">
      <h1>todos</h1>
      <form>
        <input class="new-todo" placeholder="What needs to be done?" autofocus>
      </form>
    </header>
    <section class="main {{#unless todo_exists}}hidden{{/unless}}">
      <input class="toggle-all" type="checkbox" {{#if all_completed}}checked="true"{{/if}}>
      <label for="toggle-all" class="toggle-label">Mark all as complete</label>
      <ul class="todo-list">
        {{#each todo_list}}
          <li class="todo-item {{#if this.completed}}completed{{/if}} {{#if this.editing}}editing{{/if}}">
            <div class="view {{#if this.edit}}hidden{{/if}}">
              <input class="toggle" type="checkbox"{{#if this.completed}} checked="true"{{/if}}>
              <label class="todo-label">{{this.title}}</label>
              <button class="destroy"></button>
            </div>
            <input class="edit{{#unless this.editing}} hidden{{/unless}}">
          </li>
        {{/each}}
      </ul>
    </section>
    <footer class="footer {{#unless todo_exists}}hidden{{/unless}}">
      <span class="todo-count">{{todo_count}}</span>
      <div class="filters">
        <a href="#/" class="selected">All</a>
        <a href="#/active">Active</a>
        <a href="#/completed">Completed</a>
      </div>
      <button class="clear-completed">Clear completed</button>
    </footer>
  </section>
  <footer class="info">
    <p>Double-click to edit a todo</p>
  </footer>
</script>
- Since RenderJS gadgets are reusable, you should never use
ids inside them.
- Otherwise, bad things might happen when someone puts two of your gadgets together.
- In this
<script> tag, the class allows you to refer to the script inside your JavaScript code, no matter how many copies of the same gadget are on the same page.
- The
type specifies that it is not a JavaScript script, but instead a Handlebars script.
TodoMVC Templates
- Declare
var handlebars_template; as a global variable, between "use strict" and rJS(window).
- As you saw with the
loopEventListener, anything inside the IIFE but outside the gadget chain acts a global variable for the gadget.
- Consider when the Handlebars template must be compiled.
- Since
declareService() immediately calls changeState() in the promise queue, and changeState() needs the Handlebars template to render todos, so you must compile the Handlebars template before all of that.
- So, assign the actual template before the promise queue, inside
declareService():
handlebars_template = Handlebars.compile(
  document.head.querySelector(".handlebars-template").innerHTML
);
- Now you can replace the
onStateChange() handler with:
.onStateChange(function (modification_dict) {
  var plural = this.state.item_list.length === 1 ? " item" : " items";
  this.element.querySelector(".handlebars-anchor").innerHTML =
    handlebars_template({
      todo_list: this.state.item_list,
      todo_exists: this.state.item_list.length >= 1,
      todo_count: this.state.item_list.length.toString() + plural,
      all_completed: false
    });
  this.state.update = false;
})
- This code applies the Handlebars template by replacing everything in
<main class="handlebars-anchor"> with the HTML in <script class="handlebars-template">, where for example, the content of <span class="todo-count"> is filled by the value of todo_count, and elements are checked or hidden based on the Booleans todo_exists and all_completed.
- In effect, the entire HTML is rendered from scratch every time the state changes, without using
querySelector() or appendChild(), drastically simplifying the code.
- This is the recommended procedure for OfficeJS apps, but as always, you're free to do whatever you want.
- Add
Handlebars to the IIFE, refresh your app, and notice that all the todos are blank.
- This is because you gave Handlebars many parameters involving
this, like {{this.title}} to display actual content, but the elements of todo_list are just strings.
- Rectify this by
pushing full todo objects to item_list, such as {title: "laundry", completed: false}. Perhaps you should rename it to todo_list too.
TodoMVC Style
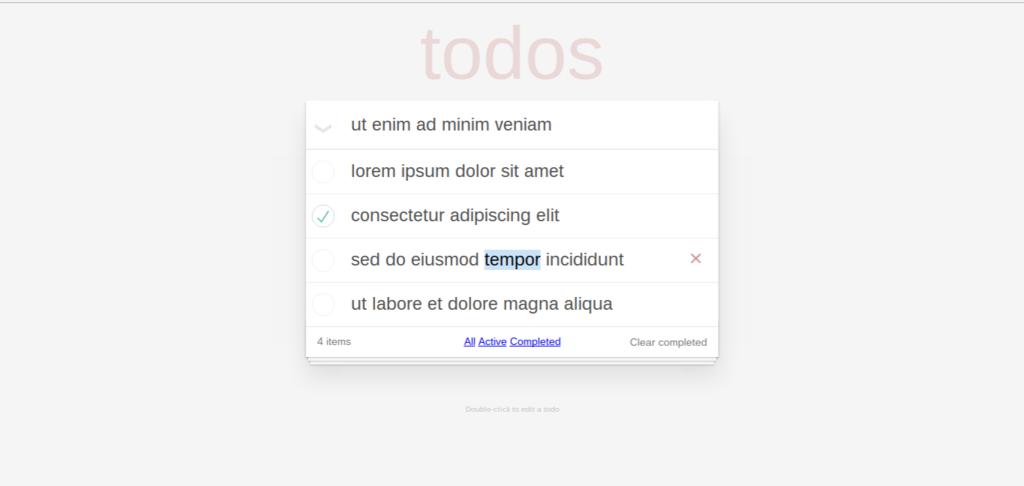
You should now have a stylish todo app truly befitting the name TodoMVC, even though none of the buttons work.
Model Remodelling
- The reason for using the ugly
apply syntax was to quickly introduce some jIO methods, but now you all know how to put() documents (JavaScript objects) with string IDs, get() documents using their IDs, and get allDocs() from a whole storage.
- Since your gadget is a model gadget, it should abstract this away from your index gadget.
- In this chapter, you will rewrite the model gadget into a real model, and dive in-depth into the remainder of the jIO API.
- For example, instead of making the index gadget call
allDocs() and then get(), the model gadget should have a function, maybe getTodoList(), that does both:
.declareMethod("getTodoList", function () {
  var gadget = this;
  return this.state.storage.allDocs()
    .push(function (result_list) {
      var promise_list = [], i;
      for (i = 0; i < result_list.data.total_rows; i += 1) {
        promise_list.push(
          gadget.state.storage.get(result_list.data.rows[i].id)
        );
      }
      return RSVP.all(promise_list);
    });
})
- Also, instead of directly overwriting todos using
put(), it should update only the given properties, like with changeState():
.declareMethod("putTodo", function (id, todo) {
  var gadget = this;
  return this.state.storage.get(id)
    .push(function (result) {
      var key;
      for (key in todo) {
        if (todo.hasOwnProperty(key)) {
          result[key] = todo[key];
        }
      }
      return result;
    }, function () {
      return todo;
    })
    .push(function (todo) {
      return gadget.state.storage.put(id, todo);
    });
})
- Carefully examine lines 12 to 14.
- You've never had to use it before, but promise queues can have both resolve and reject callbacks, just as ordinary JavaScript promises have.
- The reject callback in lines 12 to 14 is called when the previous promise throws, that is, in the case that no document with the given ID exists in the jIO storage.
- Without a reject callback, the rejection is propagated down the promise queue until either another reject callback is reached, or it falls off the end of the queue, in which case the entire queue throws the rejection.
- It's common in RenderJS applications to see trailing from the end of many promise queues,
.push(null, function (error) { console.log(error) }); in order to catch and log these rejections without letting the entire promise queue throw.
- This is a great way to debug, because this one line at the end of a promise queue with no reject callbacks will catch all rejections from inside the entire queue!
Multiple Tabs
- With these functions in place, it is up to you to delete all the previous jIO methods and update the places in
index.js that use model_gadget.
- Hint: the promise queue in
declareService() should be eight lines long.
- You should make sure that your app has the exact same functionality after this refactoring, including the multiple tabs conflict that's come up again and again.
- None of the other frameworks represented in TodoMVC bothered to solve it, but with jIO, it's so easy that we might as well.
- Why do multiple tabs cause conflicts in the first place?
- Because different tabs update in-memory objects like
state.todo_list separately, so all you have to do is ignore memory and reload the entire todo list from getTodoList() every update.
- Since you only render in
onStateChange(), you only need to change that one method.
- To do so, start up a promise queue that returns
model_gadget.getTodoList(), then use its resolved value to replace this.state.todo_list in the method.
- You can now remove
todo_list from the state and the rest of the code, which further separates the concerns of the model gadget and the index—the view.
- Functions that use
todo_list, like declareService() and addItem(), may become drastically simplified or even themselves removed by its removal, but that's all up to you.
- Since all the previous code in
onStateChange() will now be in a promise queue, the scope will change, so remember to replace this with gadget as well.
- By now, you've probably encountered this
this issue several times.
- According to JSLint,
this is very bad style.
- Since you have to change
this to gadget whenever it gets used inside a gadget chain, why not just call it gadget everywhere so you don't need to change it?
- Add
var gadget = this; to the top of every method, and replace this with gadget everywhere else.
- Henceforth, you will never need to think about promise queue scoping ever again.
UUID Storage
- Refresh your app, open it up in two different tabs, and see if they still overwrite each other. They do, even though the entire todo list is reloaded from jIO storage every time.
- Although reloading everything is all you need to do from jIO's perspective, the design of the todo list storage is holding you back.
- If you had a proper storage design from the start, everything would be trivial, though the learning curve would be rather steep.
- The problem is that you are assigning IDs for
putTodo() based on the length of todo_list, so that the IDs on each tab are almost always the same, and they end up overwriting each other all the time.
- The reason for assigning IDs like so was mainly because it is a common beginner mistake.
- It's also because
allDocs() retrieves documents in order of ID, so a numerically increasing ID puts your todos in chronological order.
- However, that's not quite true, because IDs are strings sorted in lexicographic order, so
"10" comes before "2" and "42" comes after "419".
- Therefore, if you find any other way to assign IDs, you will have no reason at all to use the current system.
- This is where the Advanced jIO comes in. Remember way back in the Basic jIO chapter, when you used a storage handler over LocalStorage in order to use
put()?
- Well, jIO also has a storage handler to automatically assign IDs to new documents.
- This is the UUIDStorage handler, which makes available a
post() method that puts a document in storage with a randomly-generated UUID, then returns that UUID.
- Change the storage parameters in
createJIO to:
{
  type: "uuid",
  sub_storage: {
    type: "document",
    document_id: "/",
    sub_storage: {
      type: "local"
    }
  }
}
Interactivity
- Now, it's time to add the rest of the functionality described in the TodoMVC application specifications.
- Add the following event listeners in
index.js to handle single click events, double click events, and keyboard events respectively.
.onEvent("click", function (event) {
  var gadget = this,
    todo_item = event.target.parentElement.parentElement,
    jio_id = todo_item.getAttribute("data-jio-id");
  return gadget.getDeclaredGadget("model")
    .push(function (model_gadget) {
      switch (event.target.className) {
      case "toggle":
        return model_gadget.toggleOneTodoStatus(
          jio_id,
          !todo_item.classList.contains("completed")
        );
      case "toggle-all":
        return model_gadget.toggleAllTodoStatus(event.target.checked);
      case "toggle-label":
        return model_gadget.toggleAllTodoStatus(
          !gadget.element.querySelector(".toggle-all").checked
        );
      case "destroy":
        return model_gadget.removeOneTodo(jio_id);
      case "clear-completed":
        return model_gadget.removeAllCompletedTodo();
      default:
        if (gadget.state.editing_jio_id
            && event.target.className !== "edit") {
          return "clicking outside of the input box cancels editing";
        }
        return "default";
      }
    })
    .push(function (path) {
      if (path !== "default") {
        return gadget.changeState({update: true, editing_jio_id: ""});
      }
    });
}, false, false)

.onEvent("dblclick", function (event) {
  var gadget = this;
  if (event.target.className === "todo-label") {
    return gadget.changeState({
      editing_jio_id: event.target.parentElement
        .parentElement.getAttribute("data-jio-id")
    });
  }
}, false, false)

.onEvent("keydown", function (event) {
  var gadget = this, item;
  if (event.target.className === "edit") {
    if (event.keyCode === ESCAPE_KEY) {
      return gadget.changeState({update: true, editing_jio_id: ""});
    }
    item = event.target.value.trim();
    if (event.keyCode === ENTER_KEY && item) {
      return gadget.getDeclaredGadget("model")
        .push(function (model_gadget) {
          return model_gadget.changeTodoTitle(
            event.target.parentElement.getAttribute("data-jio-id"),
            item
          );
        })
        .push(function () {
          return gadget.changeState({update: true, editing_jio_id: ""});
        });
    }
  }
}, false, false)
- Because all the actual logic is delegated to the model gadget, the only interesting thing in the HTML is that
preventDefault is set to false, which allows checkboxes to be toggled and inputs to be typed.
- Outside these event listeners, declare
var ENTER_KEY = 13; and var ESCAPE_KEY = 27; as global variables, beside handlebars_template.
- Optionally add
editing_jio_id: "" to setState(), which contains the ID of the field currently being edited, or "" if there is none.
- You also have to add the attribute
data-jio-id to each <li class="todo-item"> so that your event listeners can tell the model which todo to modify.
- That's simple enough in the Handlebars template:
<li class="todo-item {{#if this.completed}}completed{{/if}} {{#if this.editing}}editing{{/if}}"
    data-jio-id="{{this.id}}">
- However, the elements of the
todo_list that you pass to Handlebars don't actually have an id property, so you must figure out a way to return a list that does in getTodoList().
- This is fairly tricky, since
get() doesn't give you back the IDs you pass in, but good luck!
- Refresh your app and inspect the list elements to see if
data-jio-id is set correctly.
- Once that's done, you can start adding the actual implementation logic in
gadget_model.js:
.declareMethod("changeTodoTitle", function (id, title) {
  var gadget = this;
  return gadget.putTodo(id, {title: title});
})

.declareMethod("toggleOneTodoStatus", function (id, completed) {
  var gadget = this;
  return gadget.putTodo(id, {completed: completed});
})

.declareMethod("toggleAllTodoStatus", function (completed) {
  var gadget = this,
  return gadget.state.storage.allDocs()
    .push(function (result_list) {
      var promise_list = [], i;
      for (i = 0; i < result_list.data.total_rows; i += 1) {
        promise_list.push(
          gadget.toggleOneTodoStatus(result_list.data.rows[i].id, completed)
        );
      }
      return RSVP.all(promise_list);
    });
})

.declareMethod("removeOneTodo", function (id) {
  var gadget = this,
  return gadget.state.storage.remove(id);
})

.declareMethod("removeAllCompletedTodo", function () {
  var gadget = this;
  return gadget.getTodoList()
    .push(function (todo_list) {
      var promise_list = [], i;
      for (i = 0; i < todo_list.length; i += 1) {
        if (todo_list[i].completed) {
          promise_list.push(gadget.removeOneTodo(todo_list[i].id));
        }
      }
      return RSVP.all(promise_list);
    });
})
- Now you see why it was important to
get() from the jIO storage before calling put() in putTodo(), because changeTodoTitle() and toggleOneTodoStatus() only care about the title and completed properties respectively, and have no idea about the other.
toggleAllTodoStatus() uses the basic allDocs() because all it needs are the IDs of every todo in order to call toggleOneTodoStatus() on each.removeOneTodo() uses a jIO method, remove(), that removes the document with the given ID.removeAllCompletedTodo() uses getTodoList() because it needs the completed status of every todo.- Furthermore,
removeAllCompletedTodo() needs to know the IDs of all completed todos in order to call removeOneTodo() on them, so I hope you really did implement that properly in getTodoList()!
Editing State
- If you refresh your app, you'll see that you can toggle and destroy individual todos, toggle all todos on, and clear completed todos.
- However, you can't toggle all todos off, nor edit any.
- And if you start typing out a new todo but toggle or destroy another todo in the middle, your input is erased.
- The problem is that you haven't updated
onStateChange():
.onStateChange(function (modification_dict) {
  var gadget = this;
  return gadget.getDeclaredGadget("model")
    .push(function (model_gadget) {
      return model_gadget.getTodoList();
    })
    .push(function (todo_list) {
      var plural = todo_list.length === 1 ? " item" : " items",
        all_completed = true,
        i;
      for (i = 0; i < todo_list.length; i += 1) {
        if (!todo_list[i].completed) {
          all_completed = false;
        }
        if (todo_list[i].id === gadget.state.editing_jio_id) {
          todo_list[i].editing = true;
        } else {
          todo_list[i].editing = false;
        }
      }
      gadget.element.querySelector(".handlebars-anchor").innerHTML =
        handlebars_template({
          todo_list: todo_list,
          todo_exists: todo_list.length >= 1,
          todo_count: todo_list.length.toString() + plural,
          all_completed: all_completed
        });
      gadget.state.update = false;
    });
})
- You should keep the editing state of todos outside of jIO, because different tabs should be able to edit different todos simultaneously.
- The only way to check if all todos are completed, and to ensure that only one todo is being edited at a time, is to step through all of them.
- Four final features for you to implement, on your own, remain:
- The value of the currently edited todo should be copied from its title in jIO storage into
<input class="edit">.
- The cursor should automatically focus on the currently edited todo when
editing_jio_id exists, or <input class="new-todo"> otherwise. These two can be combined, since the same querySelector can both focus the currently edited todo and update its value.
- The current value of
<input class="new-todo"> should be saved by assigning its value to some variable before using the Handlebars template, and loading its value from that variable after using the Handlebars template.
- However, that value should be cleared in the
submit event listener, by passing in a new state property to changeState(). This will also eliminate event.target.elements[0].value = "";, ensuring that every DOM modification in the entire app really only happens in onStateChange().
Query Storage
- Unfortunately, new todos are not even added to the bottom of the list anymore, since ordering is still lexicographic on IDs, but these UUIDs are now all completely random.
- Enter yet another storage handler to the rescue, QueryStorage, which enables queries, sorting, and property selection in calls to
allDocs().
- You know how to add new handlers now, so add
type: "query" and put your current UUID/Document/LocalStorage inside as a sub_storage.
- Before you can sort your todos, you need something to sort them by.
- The most obvious is by creation date, so add the new property
creation_date: Date.now() to postTodo().
- In
getTodoList(), you can then customize allDocs() into allDocs({sort_on: [["creation_date", "ascending"]]}).
- Refresh your app, try different tabs, and everything is now sorted.
- You must have spent a lot of effort to inject IDs in
getTodoList().
- Unfortunately for your effort, jIO QueryStorage could have done all that for you:
.declareMethod("getTodoList", function () {
  var gadget = this;
  return gadget.state.storage.allDocs({
    sort_on: [["creation_date", "ascending"]],
    select_list: ["title", "completed"]
  })
    .push(function (result_list) {
      var todo_list = [], todo, i;
      for (i = 0; i < result_list.data.total_rows; i += 1) {
        todo = result_list.data.rows[i];
        todo_list.push({
          id: todo.id,
          title: todo.value.title,
          completed: todo.value.completed
        });
      }
      return todo_list;
    });
})
- In a QueryStorage, you can pass in a
select_list, and allDocs() will return a list of documents that each contain the properties of select_list in value.
- QueryStorage also supports
limit: [3, 7] to only return between 3 and 7 documents, and query: '(title:"buy%") AND (completed:"true")' to only return completed todos that begin with "buy". Notice the double quotes; jIO cannot parse single quotes.
- The moral of the story is to read the docs! You never know what might be useful in a year.
jIO Attachments
Other than a few details in the details about attachments, you now know everything there is to know about jIO!
Please carefully read through all the storage types and handlers, especially ReplicateStorage, because you can still do so much more with jIO.
- The last important concept in jIO is the idea of manipulating attachments in documents, using
putAttachment(), getAttachment(), removeAttachment(), etc.
- Attachments are always
Blobs, meant only to store binary data.
- However, some storage connectors, such as Dropbox, can only store attachments.
- Rather than trying to brute force your way using
putAttachment("foo", "bar", new Blob([content], {type: "text/plain"})) everywhere, just use a FileSystemBridgeStorage handler on top of these connectors and stick with put() and get().
Declaring Gadgets in JavaScript
- In this chapter, you will learn about communication between RenderJS gadgets and modern technologies to take your web application offline.
- As the final chapter, it is almost entirely self-directed.
- Nevertheless, if you ever get lost, the source code is available at the end.
- First, create a new gadget,
gadget_router.html and gadget_router.js.
- Try to do this all by memory: fill up both files with boilerplate, declare the new gadget in
index.html, then log its birth to the console.
- Alternatively, instead of HTML, you can also declare the gadget with JavaScript in
index.js:
.declareService(function () {
  var gadget = this,
    template = gadget.element.querySelector(".handlebars-template"),
    div = document.createElement("div");
  gadget.element.appendChild(div);
  handlebars_template = Handlebars.compile(
    document.head.querySelector(".handlebars-template").innerHTML
  );
  return gadget.declareGadget("gadget_router.html", {
    scope: "router",
    sandbox: "public",
    element: div
  })
    .push(function () {
      return gadget.changeState({update: true});
    });
})
- The parameters of
declareGadget exactly mirror the parameters in the HTML.
- An additional parameter,
element, determines which element the gadget is attached to.
- By declaring gadgets in JavaScript, you can dynamically assign scopes and elements, allowing you to treat even single todo list items as separate gadgets if you're so inclined.
- In fact, most RenderJS applications do exactly that, with a huge tree of gadgets.
- This tutorial only has three, but you'll be able to make gadget trees with what you learn.
Router Gadget JavaScript
- The goal of the router gadget is to handle the three links at the bottom of the todo list, so that, for example, navigating to
/#/completed only shows the completed todos.
- To get started, bind an event listener to the
"hashchange" event on window (you can't use onEvent() because it's not this.element), by copying the loopEventListener from Advanced RenderJS into gadget_router.js.
- Test your app to make sure that clicking the links triggers the listener.
- The router gadget has to somehow communicate with either the model gadget or the index gadget, but so far, you've only seen communication from parent to child by directly accessing all child properties and methods via
getDeclaredGadget().
Allowing Acquisition
- Child gadgets can never directly access parent properties, but can access certain parent methods via acquisition, a concept inspired by Zope, the underlying framework of Nexedi ERP5.
- The idea is that any gadget should be able to declare publically acquirable methods, which any of its child gadgets can then call, thus creating child-to-parent communication.
- Doing so allows, for example, one storage gadget to propagate its
put() and get() methods to all its subgadgets, no matter how nested they are.
- In RenderJS, parent gadgets declare publically acquirable methods thus:
.allowPublicAcquisition("setQuery", function (param_list) {
  var gadget = this;
  return gadget.changeState({query: param_list[0]});
})
- Publically acquirable methods can take many arguments, but RenderJS compresses them all into one array,
param_list, in the actual function definition.
- These methods occupy a separate namespace from ordinary declared methods, so although you would be able to call
setQuery() from all child gadgets, you would not be able to call it from the parent gadget.
- To write a method that the parent and its children all need to use, this is the convention:
.allowPublicAcquisition("setQuery", function (param_list) {
  var gadget = this;
  return gadget.setQuery.apply(gadget, param_list);
})
.declareMethod("setQuery", function (query) {
  var gadget = this;
  return gadget.changeState({query: query});
})
- Since
param_list is already an array of arguments, you might as well call apply on the actual declared method with it.
- It's important to review the differences between these identically named methods.
- The top method can only be called by the child gadgets and its sole parameter is an array.
- The bottom method can have many parameters, and can both be called by the parent gadget and indirectly called by the child gadgets through the top method.
- For your todo app, you won't need to call
setQuery from the index gadget, so you can delete the extra declareMethod().
- Now that clicking the links triggers an event listener in the router gadget, and the router gadget can change
state.query in the index gadget, filtering the todo list by completion status is merely a matter of adjusting the query of allDocs() in the model gadget.
- Add an optional query parameter to
getTodoList(), then plug it directly into allDocs(), so that for example, removeAllCompletedTodo() can call getTodoList('completed: "true"') and not worry about checking in the loop for completeness as well.
- When debugging, remember that jIO only recognizes double quotes in its queries.
Acquiring Methods
- All that's left to finish routing is making the appropriate conditional statements in the
hashchange event listener and the appropriate arguments to getTodoList().
- As a challenge problem, figure out how to set
todo_count to always be the number of uncompleted todos, even with all these queries being thrown around.
- The flow of control goes something like this:
- First, the user changes the hash in the URL, likely by clicking a link.
- Second, the router gadget receives the
hashchange event, and translates the hash to a specific query for allDocs().
- Third, the router gadget calls
setParentQuery() with said query, which calls setQuery() on the index gadget via acquisition.
- Fourth,
setQuery() on the index gadget calls changeState() with said query, which triggers onStateChange() with query in modification_dict.
- Fifth,
onStateChange() calls getTodoList() with said query.
- Finally, the model gadget calls
allDocs() with said query, and the resulting list of todos has been successfully filtered by the hash changing.
Service Workers
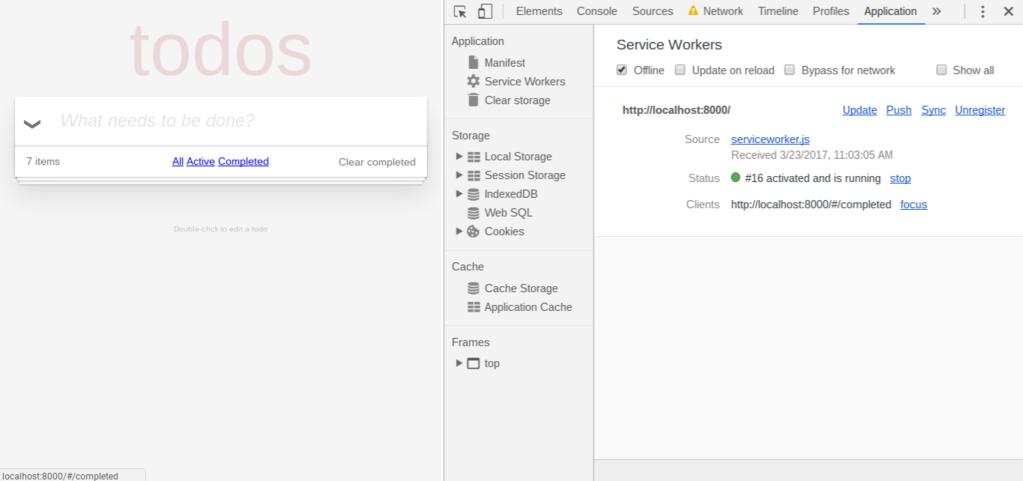
For the final part of the final chapter, you will take your web app offline.
Follow the steps in the details, and make sure your app works offline, as shown in the screenshot above.
- Nevertheless, for such a simple todo app, you can just copy the following code, with all its raw promises, into
serviceworker.js:
/*jslint nomen: true, indent: 2, maxerr: 3, maxlen: 80*/
/*global self, caches, fetch*/
(function (self, caches, fetch) {
  "use strict";

  var CACHE_VERSION = 1,
    CACHE_NAME = "todos-renderjs-" + CACHE_VERSION.toString();
  self.addEventListener("install", function (event) {
    event.waitUntil(caches.open(CACHE_NAME)
      .then(function (cache) {
        return cache.addAll([
          "./",
          "rsvp.js",
          "renderjs.js",
          "jio.js",
          "handlebars.js",
          "launcher_icon.png",
          "base.css",
          "index.css",
          "index.html",
          "index.js",
          "gadget_model.html",
          "gadget_model.js",
          "gadget_router.html",
          "gadget_router.js"
        ]);
      })
      .then(function () {
        return self.skipWaiting();
      }));
  });

  self.addEventListener("fetch", function (event) {
    event.respondWith(caches.match(event.request)
      .then(function (response) {
        return response || fetch(event.request);
      }));
  });

  self.addEventListener("activate", function (event) {
    event.waitUntil(caches.keys()
      .then(function (keys) {
        return Promise.all(keys
          .filter(function (key) {
            return key !== CACHE_NAME;
          })
          .map(function (key) {
            return caches.delete(key);
          }));
      })
      .then(function () {
        self.clients.claim();
      }));
  });

}(self, caches, fetch));
- Then refresh your app, disconnect from the Internet, and play around with it.
Web Manifest
- Now that we have a service worker, we can make our TodoMVC application into a progressive web app, a web application that behaves like a native one on Android.
- Doing so is ridiculously easy. Just find an icon and save it in your app folder.
- Create a new file,
manifest.json, with the following:
{
      "short_name": "OfficeJS Todos",
      "name": "OfficeJS Todo List - Sample Tutorial Application",
      "icons": [{
        "src": "launcher_icon.png",
        "sizes": "any",
        "type": "image/png"
      }],
      "start_url": "./",
      "display": "standalone"
    }
- Now upload your app on a real server, and access it via your Android phone.
- You'll eventually be prompted to add it to your home screen, just like a native app!
Conclusion
Congratulations! You've just made a fully responsive, storage-agnostic, modular, mobile-friendly, offline-first, progressive web application. You can check out our reference implementation on Nexedi Gitlab.
What's next?
Participate in the OfficeJS app developer contest!
Using RenderJS and jIO, the only limit is your own imagination. Good luck on your journey as an OfficeJS developer!