Network topology explained
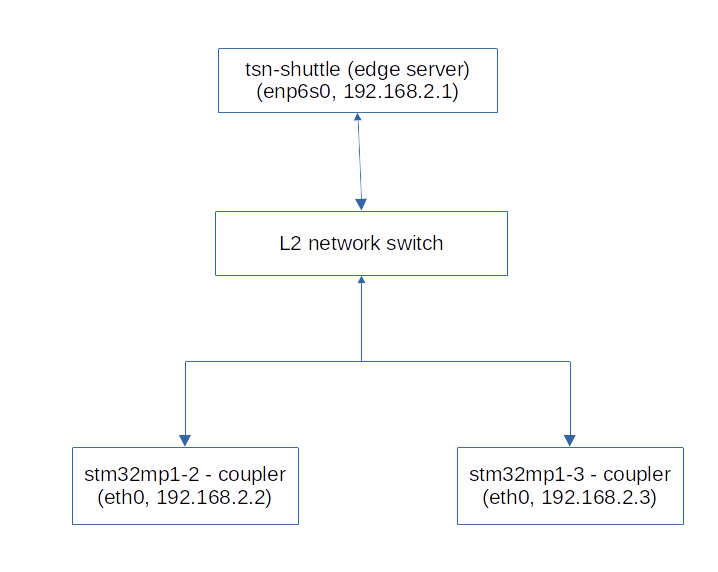
As seen on picture below we have one edge server which in network terms runs as a network router and attached to it a L2 network switch. To the switch we have 2 rPLC couplers connected with RJ45 LAN cables. For the purpose of the how-to we use this network range 192.168.2.0-255 range. Each of the couplers has its own statically assigned IPv4 address. The edge server is able to act as a router / gateway and forward packets to outside network (Internet).
Configure default network configuration
Configure edge server
- Set default static address for the NIC to which the L2 network switch is connected to. It will act as a gateway also. For this it is required to edit /etc/network/interfaces file and place following code inside:
auto enp6s0
iface enp6s0 inet static
  address 192.168.2.1
  netmask 255.255.255.0
- Make sure that tsn-shuttle can act as a router and router packets from stm32mp1-2 and stm32mp1-3 couplers.
root@tsn-shuttle:~# sysctl -w net.ipv4.ip_forward=1
- Make sure that traffic is allowed on designated interface
-
root@tsn-shuttle:~# iptables -t nat -A POSTROUTING -o enp6s0 -j MASQUERADE
root@tsn-shuttle:~# iptables -I FORWARD -o enp6s0 -s 192.168.0.0/16 -j ACCEPT
root@tsn-shuttle:~# iptables -I INPUT -s 192.168.0.0/16 -j ACCEPT
# save persistently between reboots
root@tsn-shuttle:~# iptables-save
- Restart network for this interface with
root@tsn-shuttle:~# ifup enp6s0
Configure coupler
Note: this step needs to be executed for the two couplers. The only difference between them is the IPv4 address which should be as follows:
- stm32mp1-2 with IPv4 = 192.168.2.2
- stm32mp1-3 with IPv4 = 192.168.2.3
- Set default static address for the NIC to which coupler is connected to the L2 network switch. For this it is required to edit /etc/network/interfaces file and place following code inside:
auto eth0
iface eth0 inet static
  address 192.168.2.2
  gateway 192.168.2.1
  netmask 255.255.255.0
- Restart network for this interface with
root@stm32mp1-2:~# ifup eth0
Make sure that all machines are ping-able
We need to assure that all of the above configurations are working properly. The best way is to use ping
root@tsn-shuttle:~# ping 192.168.2.2
root@tsn-shuttle:~# ping 192.168.2.3
# and from couplers to edge server
root@stm32mp1-2:~# ping 192.168.2.1
root@stm32mp1-3:~# ping 192.168.2.1
Configure time synchronization between all machines
We need to make sure that all machines have their time precisely set. For this we use the following standard IEEE 802.1AS and linuxptp project
Install linuxptp on all machines
Note: even though linuxptp is packaged for almost all OS distributions we will compile from source as follows. It is required to do on all machines!
root@stm32mp1-3:~# wget https://sourceforge.net/projects/linuxptp/files/v3.1/linuxptp-3.1.1.tgz
root@stm32mp1-3:~# tar -xvf linuxptp-3.1.1.tgz
root@stm32mp1-3:~# cd linuxptp-3.1.1
root@stm32mp1-3:~/linuxptp-3.1.1# make
root@stm32mp1-3:~/linuxptp-3.1.1# make install
Start MASTER clock on edge server
Following command will start synchronization process at edge server to all clients on interface enp6s0. Note: this command should be run within a screen!
root@tsn-shuttle:~# ptp4l -2 -H -i enp6s0 -m --socket_priority=7 --tx_timestamp_timeout=40
Start SLAVE clock on couplers
Following command will start synchronization process from edge server. Note that this command should be run within a screen! Also it should be done also for two coupler machines.
root@stm32mp1-2:~# ptp4l -2 -s -i eth0 -m --socket_priority=7 --tx_timestamp_timeout=40
Sync physical to system time
Following command will copy the so called PHY (physical time) as emitted from edge server to the local system time used by all application on the system. Note that this command should be run within a screen! Also it should be done also for all machines as shown below.
root@tsn-shuttle:~# phc2sys -s enp6s0 -O 0 &
root@stm32mp1-2:~# phc2sys -s eth0 -O 0 &
root@stm32mp1-3:~# phc2sys -s eth0 -O 0 &
Configure multicast network
Configure multicast on edge server
root@tsn-shuttle:~# ifconfig enp2s0 multicast
root@tsn-shuttle:~# route -n add -net 224.0.0.0 netmask 240.0.0.0 dev enp6s0
Configure multicast on coupler
Note: these command must be executed on both of the connected couplers.
root@stm32mp1-2:~# ifconfig eth0 multicast
root@stm32mp1-2:~# route -n add -net 224.0.0.0 netmask 240.0.0.0 dev eth0
Test multicast works
Compile tool for sending and receiving multicast messages
Note: you need to do on all machines and this will generate needed commands for you (msend and mreceive).
root@tsn-shuttle:~# git clone https://github.com/troglobit/mtools.git
root@tsn-shuttle:~# cd mtools/
root@tsn-shuttle:~/mtools# make
root@tsn-shuttle:~/mtools# make install
Really test if multicast works
# start sending multicast messages from edge server
root@tsn-shuttle:~# msend

# and run mreceive command on both couplers
root@stm32mp1-2:~# mreceive
root@stm32mp1-3:~# mreceive
Note: if everything works as expected one can see messages emitted from edge server to both of couplers in the terminal.
Configure TSN network shaping
Note: this part of the how-to will adjust network into 4 different classes. It is done just as an example as real configuration and number of classes depends on the desired usage.
Configure shaping using tc
Note: this command will create 4 network classes and assign to each of it equal in time interval. It is only given as an example.
root@tsn-shuttle:~# tc qdisc replace dev enp6s0 handle 100 parent root taprio num_tc 4 \
                            map 3 3 3 3 3 2 1 0 3 3 3 3 3 3 3 3 \
                            queues 1@0 1@1 1@2 1@3 \
                            base-time 1528743495910289987 \
                            sched-entry S 0x01 250000 \
                            sched-entry S 0x02 250000 \
                            sched-entry S 0x04 250000 \
                            sched-entry S 0xf8 250000 \
                            clockid CLOCK_TAI \
                            flags 0x00
Modify network class using iptables
Note: this command will set network class 4 for traffic using TCP protocol to destination port 5201. It is only given as an example.
root@tsn-shuttle:~# iptables -t nat -A PREROUTING -p tcp --dport 5201 -j CLASSIFY --set-class 0:4
Network performance and testing
In setup above we used TSN shaping to setup a network with 4 different TSN classes. As evaluating a network can differ from one network to another we can only give a very basic example based on settings above (chapter Configure TSN setting network).
For our example we want to make sure that traffic which is generated from client (stm32mp1-2 coupler) to edge server (tsn-shuttle) is using a specific class and doesn't influence any other control PLC traffic. This also will prove that TSN shapping works and that it is deterministic. For further evaluation of the deterministic behavior one ca see following article, chapter "Measurement 1: Beremiz PLC control cycle latency".
Run iperf3 at edge-server (in a server mode)
root@tsn-shuttle:~# iperf3 -s
Run iperf3 at coupler (in a client mode)
root@stm32mp1-2:~# iperf3 -c 192.168.2.1 -t 100
Monitor in real time the traffic control queue statistics
Note following command (see below) below will show the number of bytes which are transferred over one of the 4 traffic class or queues how they are referred to in the command's output. If your setup is proper then two queues will be used as follows:
- qdisc pfifo 0: parent 100:4 - for traffic comming from iperf3
- qdisc pfifo 0: parent 100:1 - for traffic generated by PTP4L commands (see chapter "Configure time synchronization between all machines")
root@tsn-shuttle:~# watch -d tc -s qdisc show dev enp2s0
qdisc taprio 100: root refcnt 5 tc 4 map 3 3 3 3 3 2 1 0 3 3 3 3 3 3 3 3
queues offset 0 count 1 offset 1 count 1 offset 2 count 1 offset 3 count 1
clockid TAI	base-time 1528743495910289987 cycle-time 1000000 cycle-time-extension 0
	index 0 cmd S gatemask 0x1 interval 250000
	index 1 cmd S gatemask 0x2 interval 250000
	index 2 cmd S gatemask 0x4 interval 250000
	index 3 cmd S gatemask 0xf8 interval 250000

 Sent 182226698 bytes 2139557 pkt (dropped 0, overlimits 0 requeues 76)
 backlog 0b 0p requeues 76
qdisc pfifo 0: parent 100:4 limit 1000p
 Sent 175772440 bytes 2039913 pkt (dropped 0, overlimits 0 requeues 0)
 backlog 0b 0p requeues 0
qdisc pfifo 0: parent 100:3 limit 1000p
 Sent 0 bytes 0 pkt (dropped 0, overlimits 0 requeues 0)
 backlog 0b 0p requeues 0
qdisc pfifo 0: parent 100:2 limit 1000p
 Sent 52020 bytes 578 pkt (dropped 0, overlimits 0 requeues 0)
 backlog 0b 0p requeues 0
qdisc pfifo 0: parent 100:1 limit 1000p
 Sent 6402238 bytes 99066 pkt (dropped 0, overlimits 0 requeues 0)
 backlog 0b 0p requeues 0
If for the sake of experiment one want to check if / how trafic shaping works one can adjust --socket_priority argument to another value (see chapter "Configure time synchronization between all machines").
Conclusions
Your network setup is ready for Beremiz IDE/runtime and rPLC.