The listbox is a main component in ERP5 used for displaying lists of objects.
While it has many features sometimes it's helpful just to know the different ways
of displaying data using a listbox. This HowTo will show you.
Note that you will need to have developer access if doing these steps on
your own instance. We'll work in the ERP5
interface, the Zope interface, write some metal scripts and access the portal
catalog itself. Also, you will need some time (1hr minimum).
Table of Contents
Web Section Predicate
Setting Predicates
One standard way listboxes are used in ERP5 web sites is through Predicates
- using parameters defined on a web section to determine which objects should be
made available to web pages in this section. Think of Predicates as logic
directly "built into" the web section itself
(read more about predicates here).
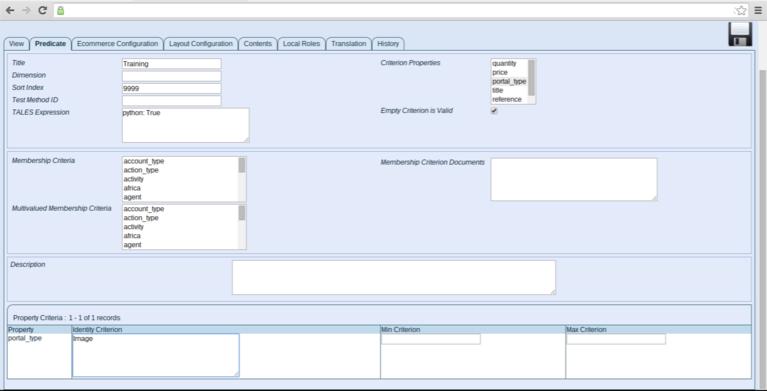
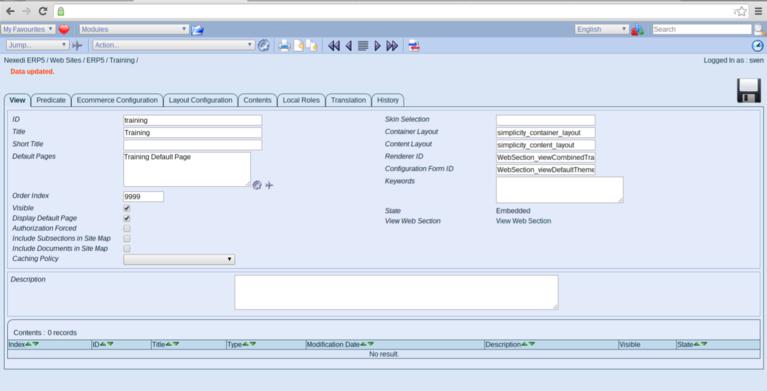
Predicates must be set on the Predicate view of a web section. We'll use
the training section of our (at the moment of writing) current erp5 web site to
show how it works.
We'll try to display a list of web pages in this tutorial, so to begin:
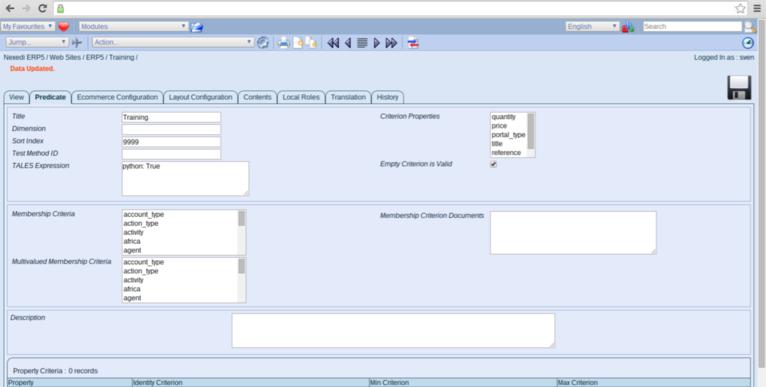
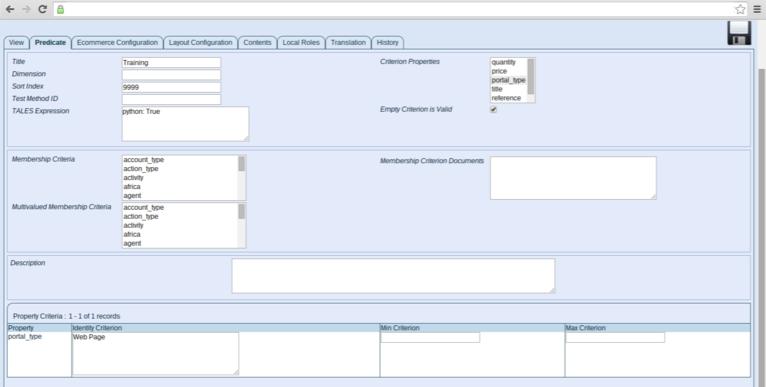
- On Criterion Properties, select
portal_type
- Save to add the criterion setting line at the page bottom
- On property portal_type add
Web Page
- Save again.
It is relatively easy to set data to display like this - even fetch multiple types
of documents (for example portal_type:Product with Price:min:1 to max:100)
without having to write any underlying logic and without having to use Membership
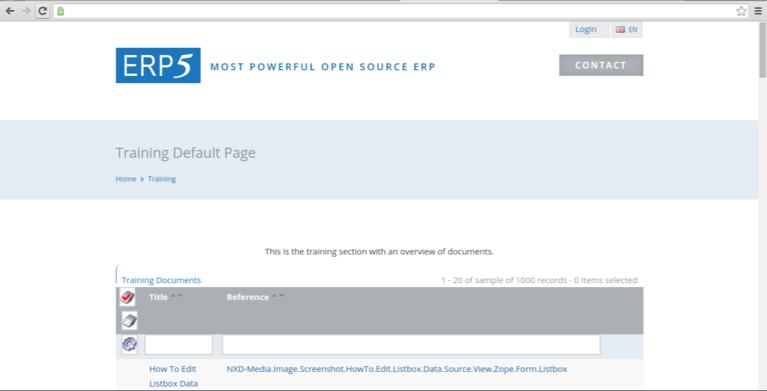
Criteria. Your finished page should look like this:
Note that we have only set the objects to be available on a web page
within this web section. Data is available to display but not displayed
yet. Let's do this now. Go back to the web section View tab.
Define A Default Web Page to Display
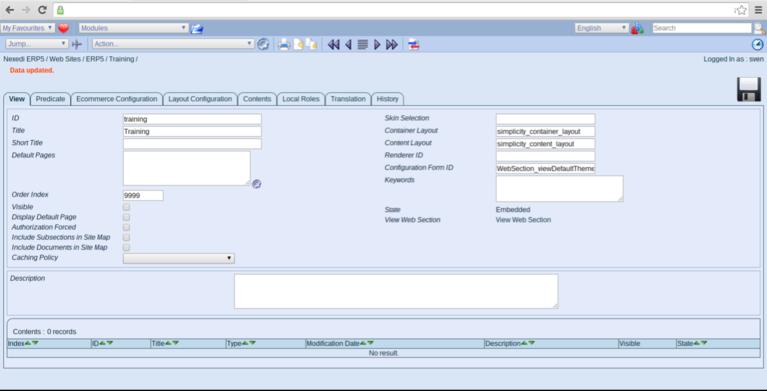
Currently the web section does not have any page set to display. We'll do a quick
detour and define a default web page to display.
- Check property Visible
- Check property Display Default Page
- In Default Pages add the title of a page called
Training Default Page
- Save
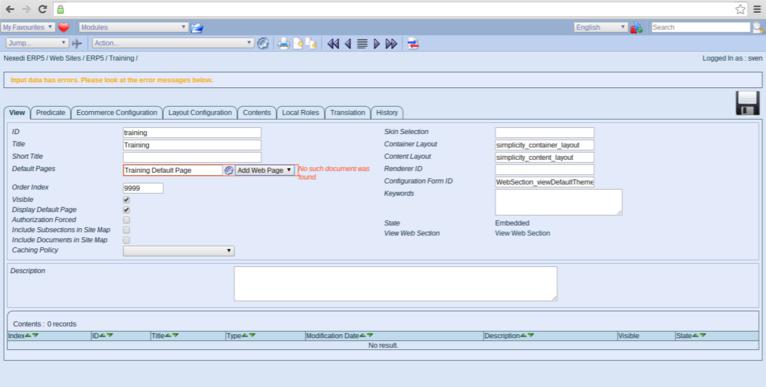
- In the Validation, pick
Add Web Page on the Default Pages Validation Dialog
- Save again
Almost done. A default page to display has been created. We need to add some
text and publish this page to display it.
-
Click on the Plane icon of the Relationstring Field
to go to the web page we have just created.
- Add
Training.Default.Page as page Reference
- In my case, I have to add Group of
Nexedi to enable publishing of the document
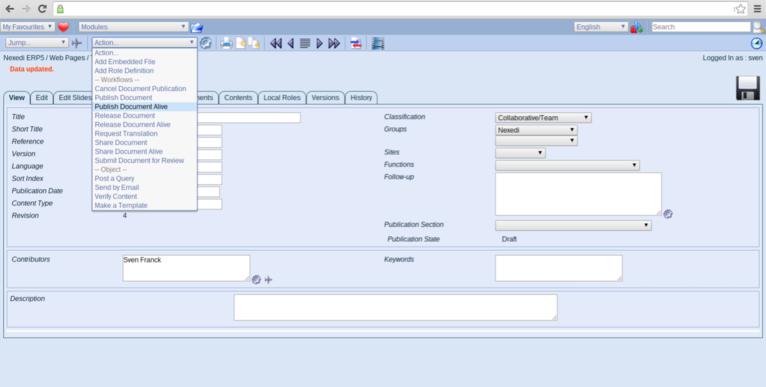
- Save
- From the Action Dialog, select
Publish Document Alive
- Confirm Publishing Alive
See the HowTo on
document state for more information on document workflows and the different states.
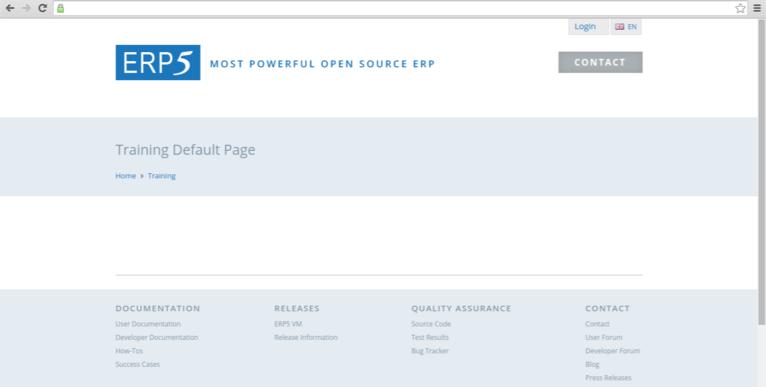
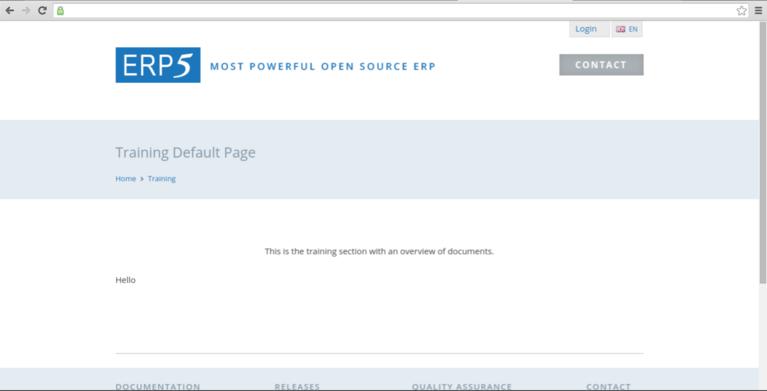
We'll now add some plain HTML to display and then head back to the web section.
- Click the Edit tab
-
Add some HTML
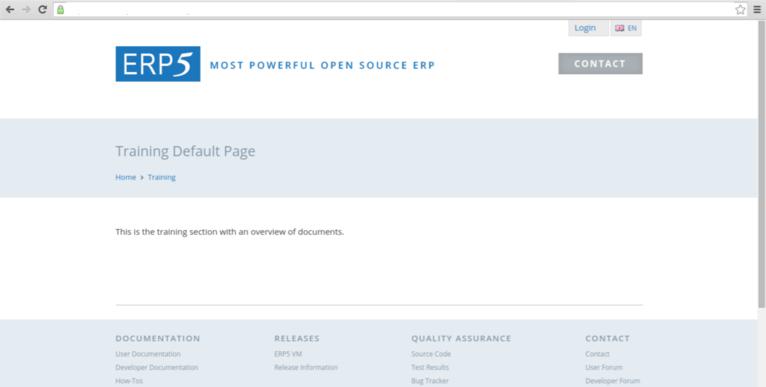
<p>This is the training section with an overview of documents</p>
- Save

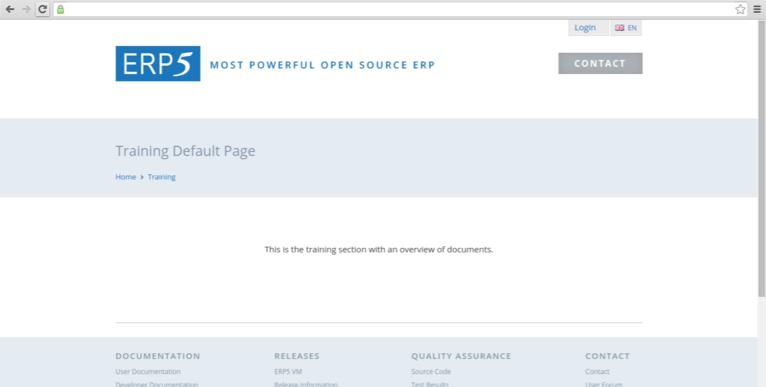
If we look at the website now, we should see the text of our default page. So
far nothing special, but good to know. Next we'll add the listbox.
Adding a listbox to a Web Page
Currently our web page displays no listbox because we have not defined there to
be one. There are a few ways to add listboxes and we'll look at all of them from
simple to difficult.
Default View
The easiest way we have already done without anyone noticing. You should know
that ERP5 displays are called Views and default views are called view
and list. Let's access them.
- Add
/view to the end of your website url and look at the page
- Try
/list and /foo, too
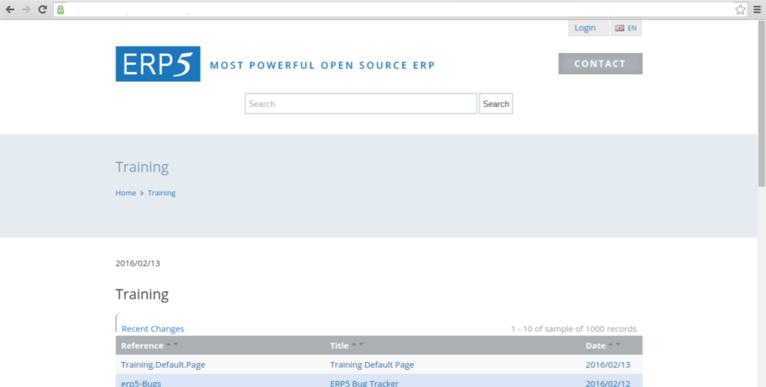
Of course foo will not work - it's just to show that the other two
variants are default views in ERP5 settable using Predicates. They give
us a listbox displaying a list of web pages. This is the default
variant - fully functional - but very unconfigured. Let's quickly change
the portal type before continuing to show how to adapt this listbox.
- Head back to the web section Predicate view.
- Replace
Web Page with Image in the portal_type property
- Save
- Refresh either the
/view or /list web page
Instead of a list of web pages we now have a list of images. Not very complicated.
Note, that if you are using a front end with caching policies defined, you
should access the /web_site_module/[your_web_site_name]/training/view
variant of the URL to not be served cached pages.
Using a Renderer ID to set a Form containing a Listbox
An alternative way to display a listbox is using Renderers. The web section Renderer ID property can take a variety of parameters - from Python
scripts to Zope page templates to forms and callable objects. Let's start with
another standard case using an ERP5 Form. We want to upgrade our plain listbox
to also include the content of our default page. This requires working in Zope
interface, so you'll need the correct permissions to continue.
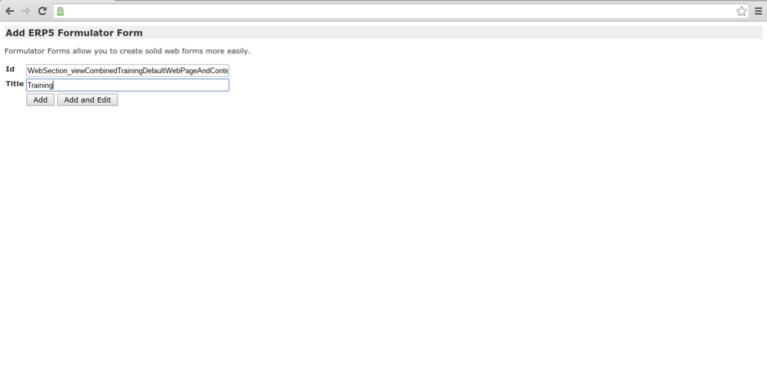
Adding the Renderer
- Go back to the web section
- Set a Renderer ID of
WebSection_viewCombinedTrainingDefaultWebPageAndContent
-
(Take a minute and pay respect to our Naming Conventions)
- Save
Refreshing the web page now (without any view set in the URL) will of
course result in a site error as the renderer we have defined has not been created
yet. Let's do this now.
- Go to your instance
portal_skins/[your_skin]/manage_main
- Add a new ERP5 Form
- Set id to
WebSection_viewCombinedTrainingDefaultWebPageAndContent
- Set title to
Training
- Save and Edit
This will take you to the form default menu. Nothing is set, but since we now
have a form defined, the page will no longer break if refreshed.
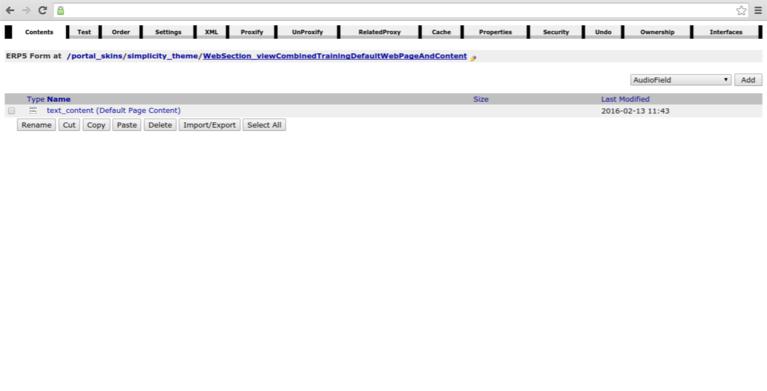
Adding the Default Page
Let's quickly add back the default page to display.
- Add an
Editorfield
- Set the id to
text_content
- Set the title to
Default Page Content
- Save
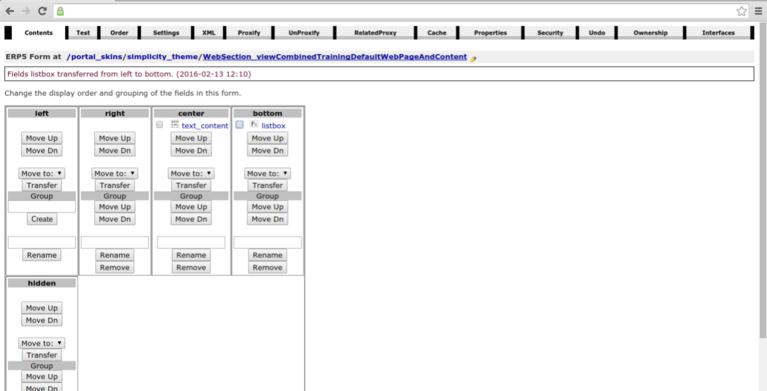
Before setting the content, make sure to place the editor field correctly.
- Click on the Order Tab
- Select the text_content property
- Pick the
Center group and click Transfer
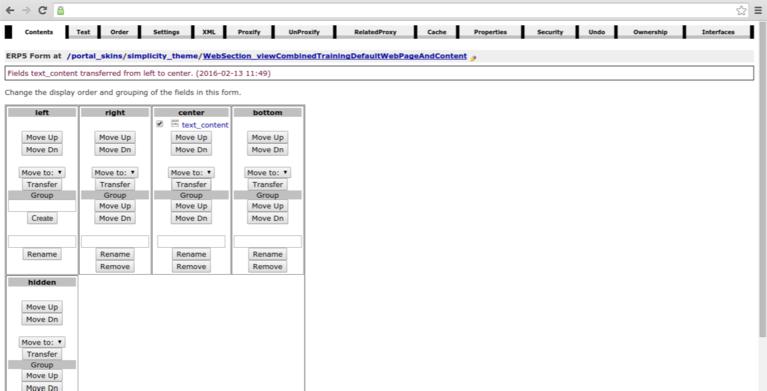
This moved our text content field to the center region. The listbox will later
go to the bottom. Now edit the field as follows:
- Click the Contents tab to return
- Access the text_content field
- Click on the TALES tab to set a script for fetching content
-
In Default property define:
python:here.getDefaultDocumentValue().asStrippedHTML()
-
In Enabled property define:
python:here.getDefaultDocumentValue() is not None
- Save
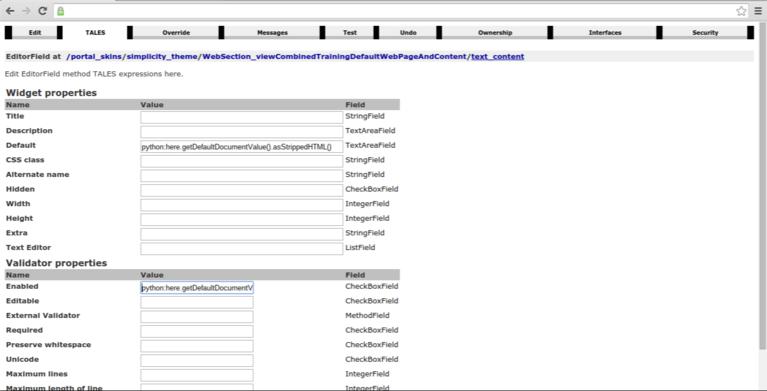
You should understand what we have set here. The Enabled property will
cause this field to be active if a default document value has been set. This
is our default page defined on the web section. In case it is defined (which it is), the Default
property of the field is set to fetching the default document as stripped HTML
which will return the HTML of the default page. All methods used are standard
ERP5 methods - you could however define your own methods, too. Nothing prevents
you from setting multiple conditions for the field to render or declaring
asStrippedHTML in your skin to acquire it ahead of the base method and
thus overwrite its functionality.
Refreshing the web page now will bring back the content of our default page.
Next we'll add the listbox.
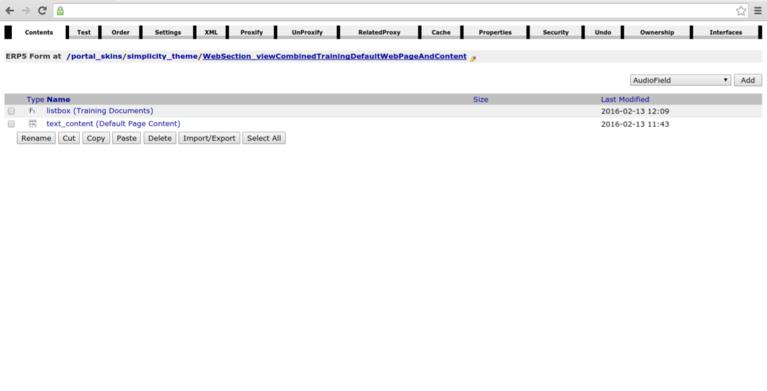
Adding the Listbox
- Back in the Content tab
- Add a Listbox
- Set id to
listbox
- Set title to
Training Documents
- Save
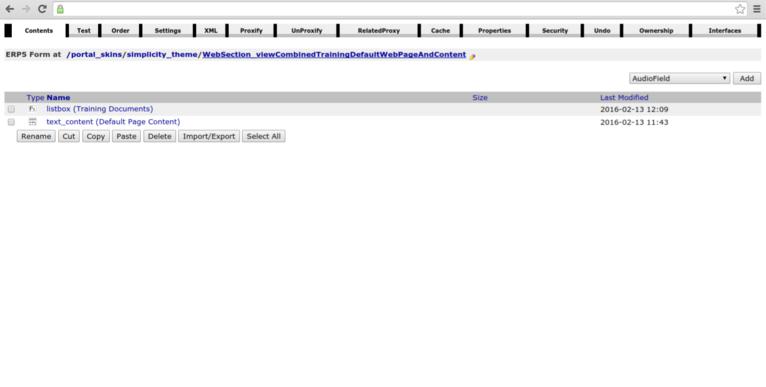
- Click the Order tab
- Select the listbox field
- Pick
Bottom section as target
- Click
Transfer to move the listbox there
- Go back to Contents tab
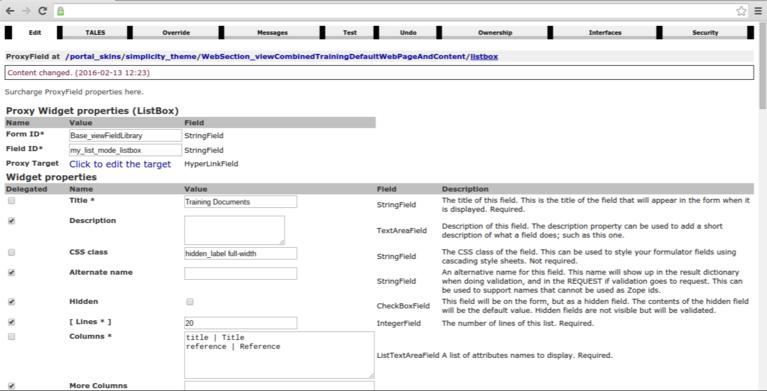
We know have a listbox named and placed on the page. Next we need to configure it.
This will be a basic configuration (for a more in depth look, please check
HowTo Configure a Listbox).
- Pick
my_list_mode_listboxfrom the Base_viewFieldLibrary
- Save to fetch this default field from the field library
- Set a CSS class of
hidden_label full-width (not really necessary for this HowTo)
- Set Columns to show to
title | Title
reference | Reference
- Save
We will keep the columns simple to later change the underlying data without
having to update the listbox every time. Title and Reference
should exist on all portal types. Continue:
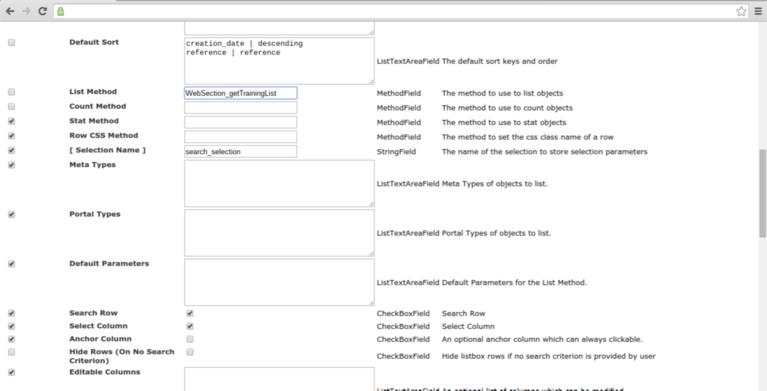
- Set the Default Sort to:
creation date | descending
- Set the List Method to
WebSection_getCachedDocumentValueList
- label the [Selection Name] to
search_selection
- Save
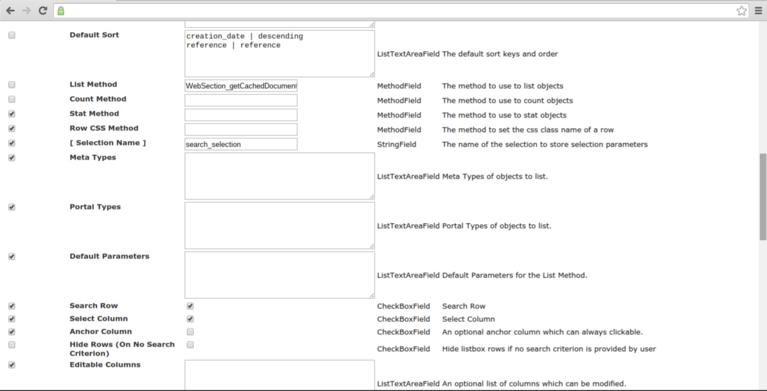
The key parameter here is the List Method. Through using the standard
method it will fetch the elements set on the underlying web section. This will
again be our predicate as you will see in a moment. Note you could also
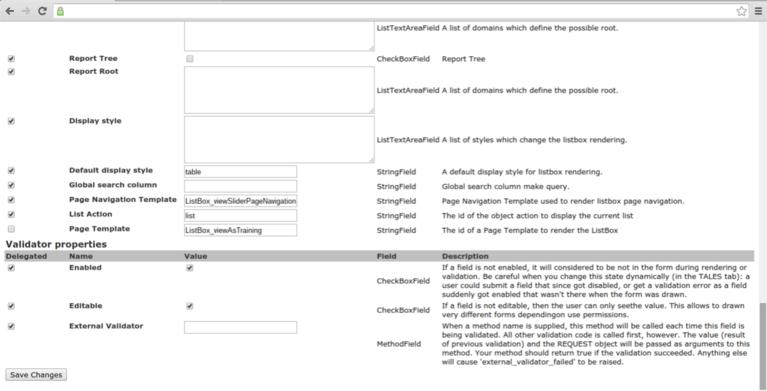
define your own method here to provide whichever data you want. But do continue:
- Leave Display Style as
table
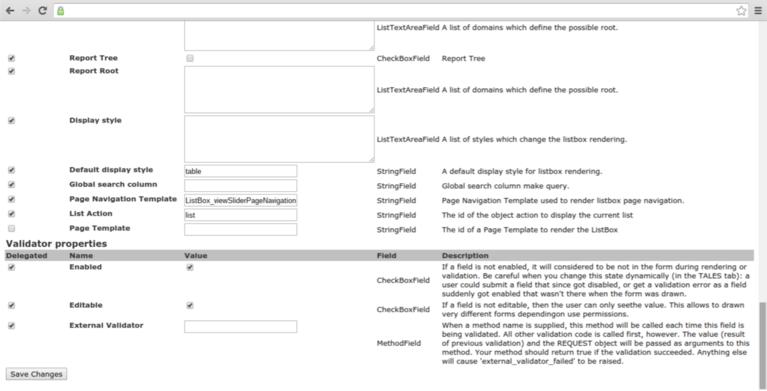
- Leave Page Navigation Template as
ListBox_viewSliderPageNavigation
- Make sure Page Template is not defined (we'll do this later)
- Save
This will give us a standard listbox without any overrides. We will use the page
template in a bit to do some customization. Last steps:
- Go to the TALES tab
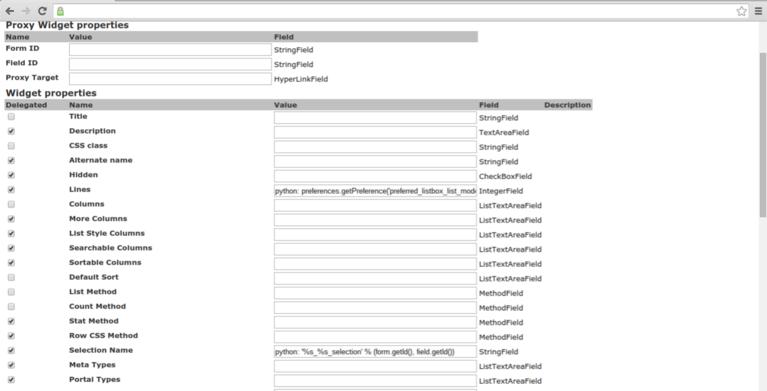
- Make sure Lines is set to:
python: preferences.getPreference('preferred_listbox_list_mode_line_count', 30)
- Make sure Selection Name is set to:
python: '%s_%s_selection' % (form.getId(), field.getId())
- Save
These properties might already be set (I admit to cloning a listbox vs creating
it from scratch). We should be all set and if you now refresh your web site
you should have a (in my case extremly unappealing looking) listbox showing web
pages together with the HTML content of our default page. Viola.
Changing the Data Source via Listbox Configuration
We could now update the predicate again to see how the data changes. Alternatively
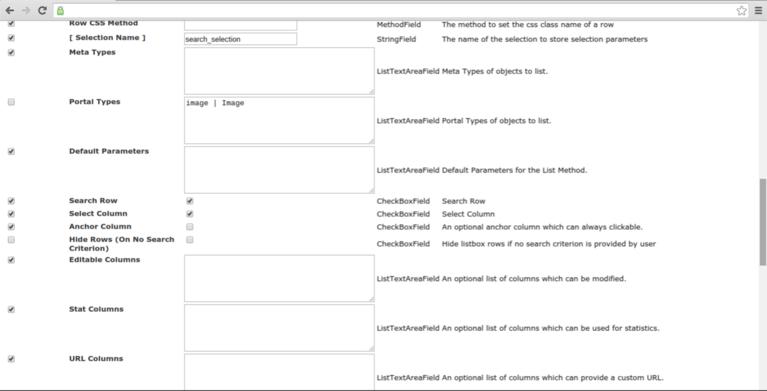
you can update the listbox Portal Type property.
- Set Portal Type to:
image | Images
- Save
Defining a portal type on a listbox will override predicate settings, so
if you now refresh your web page, you'll have changed the data source and will see
a list of images instead of the previous list of web pages. Keep in mind that switching
portal types may also require to update columns. This is just an easy example where
it is not necessary.
Next, we will switch the layout and fetch the listbox data from from a metal script.
Fetching Listbox Data from Within a Metal Script
We have seen how to generate listboxes and provide data through predicate and
listbox configuration. Let's improvise a bit, create a different layout and
fetch data through a Zope Metal Script.
Using Listbox Page Templates
- Go back to the listbox configuration
- Define a Page Template called
ListBox_viewAsTraining
- Save
Now we will have to create the listbox HTML ourselves. Go back
to your portal_skin, so we can create the page template.
- Back in portal skin
- Add a Page Template
- Call it
ListBox_viewAsTraining
- Save
- Open your template, clear and save
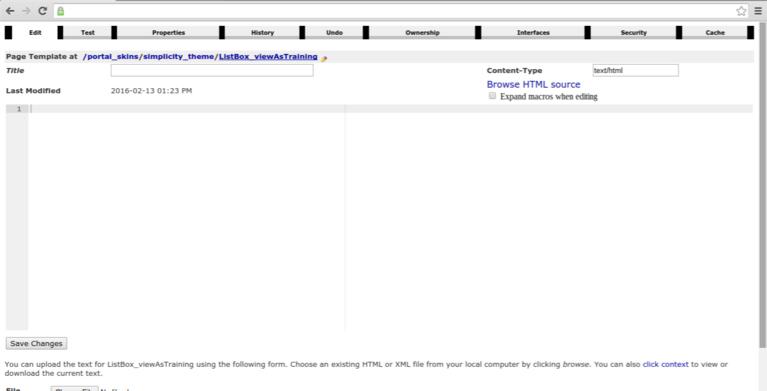
Let's assume you are familiar with writing page templates. For starters, let's
see if things work.
- In your template just add:
<p>Hello<p>
- And Save
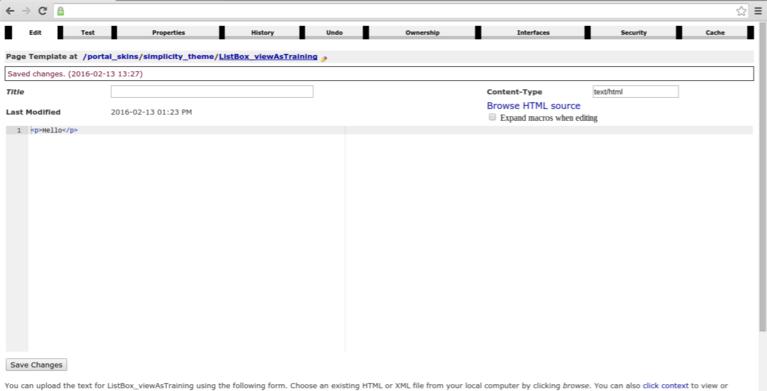
Check your page to see whether the template correctly renders.
It does, so now it is possible to make a custom layout any way we want.
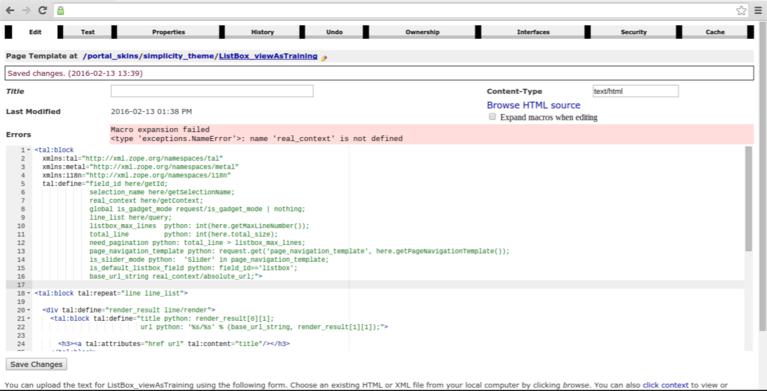
- Add the following script in your template:
<tal:block
  xmlns:tal="http://xml.zope.org/namespaces/tal"
  xmlns:metal="http://xml.zope.org/namespaces/metal"
  xmlns:i18n="http://xml.zope.org/namespaces/i18n"
  tal:define="field_id here/getId;
              selection_name here/getSelectionName;
              real_context here/getContext;
              global is_gadget_mode request/is_gadget_mode | nothing;
              line_list here/query;
              listbox_max_lines  python: int(here.getMaxLineNumber());
              total_line         python: int(here.total_size);
              need_pagination python: total_line > listbox_max_lines;
              page_navigation_template python: request.get('page_navigation_template', here.getPageNavigationTemplate());
              is_slider_mode python:  'Slider' in page_navigation_template;
              is_default_listbox_field python: field_id=='listbox';
              base_url_string real_context/absolute_url;">

<tal:block tal:repeat="line line_list">

  <div tal:define="render_result line/render">
    <tal:block tal:define="title python: render_result[0][1];
                           url python: '%s/%s' % (base_url_string, render_result[1][1]);">

      <h3><a tal:attributes="href url" tal:content="title"/></h3>
    </tal:block>
  </div>

</tal:block>

<tal:block tal:condition="need_pagination">
  <input type="hidden"
         name="list_selection_name"
         value="default"
         tal:attributes="value selection_name" />
  <input type="hidden"
         name="listbox_uid:list" />
  <input type="hidden" name="selection_name_selection_key" value="md5"
         tal:define="selection_key here/getSelectionKey"
         tal:condition="selection_key"
         tal:attributes="name string:${selection_name}_selection_key;
                         value selection_key" />
  <div class="listbox-footer-box">
    <tal:block metal:use-macro="container/ListBox_asHTMLLibrary/macros/listbox_navigation" />
  </div>
</tal:block>

</tal:block>
- Save
- (Ignore the error, for another tutorial)
Your script should look like this (more info on what's happening below)
Have a look at the define section where we fetch properties set on
the listbox. The most important one is the line_list here/query;,
because this is where we get our data. In this case it will fetch data from
the listbox, which fetches from the predicate. Again it would be possible to
override on the listbox. The other parameters are copy and pasted to add pagination
at the bottom of the page.
<tal:block
  xmlns:tal="http://xml.zope.org/namespaces/tal"
  xmlns:metal="http://xml.zope.org/namespaces/metal"
  xmlns:i18n="http://xml.zope.org/namespaces/i18n"
  tal:define="field_id here/getId;
              selection_name here/getSelectionName;
              real_context here/getContext;
              global is_gadget_mode request/is_gadget_mode | nothing;
              line_list here/query;
In the following section we loop over the line_list. If you do this
yourself, make sure to call render on the line, otherwise you will get
unreadable rubbish (calling render will give you readable rubbish).
I'm not sure where the parameters being returned are defined, so if
you require more parameters, experiment a little with the layout below to see
which parameters are hidden where. For sake of simplicity we only output a list
with headers and links to the page.
<tal:block tal:repeat="line line_list">

  <div tal:define="render_result line/render">
    <tal:block tal:define="title python: render_result[0][1];
                           url python: '%s/%s' % (base_url_string, render_result[1][1]);">

      <h3><a tal:attributes="href url" tal:content="title"/></h3>
    </tal:block>
  </div>

</tal:block>
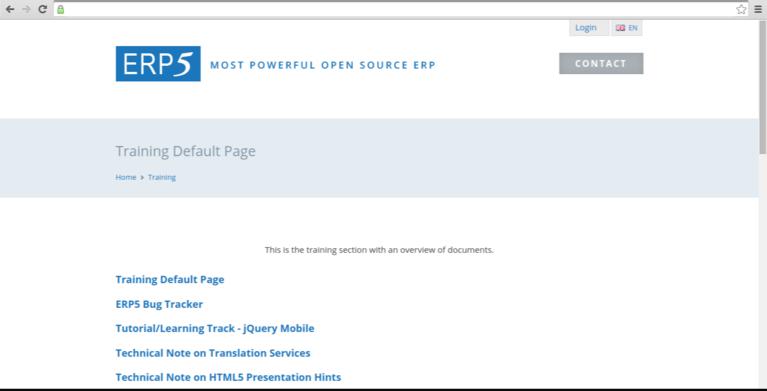
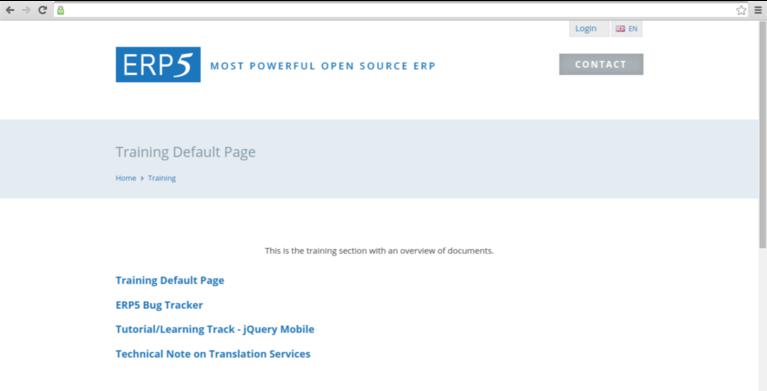
Have a look at the web page now. Worked nicely and we have a linked list of
elements along with pagination. If you know your metal and HTML you can now build
any layout you like using the default data provided.
Displaying Page Templates with Scripts using Portal Catalog
We mentioned before that instead of WebSection_getCachedDocumentValueList
you could use any script to fetch the data to be displayed on the listbox. This
would effectively override predicates as well as listbox configuration. It is
possible to do this directly inside the listbox or also in the page template which
we will show now.
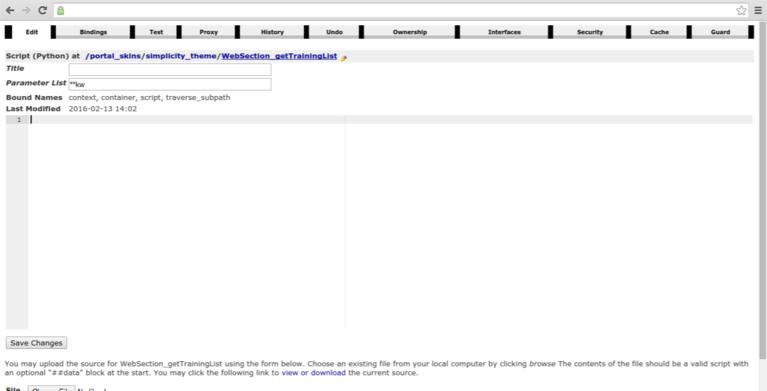
- Go back to your portal skin folder
- Add a Script called
WebSection_getTrainingList
- Save
- Open the script, clear content and save again
Writing a Script to query the portal catalog
The catalog includes key meta information on objects stored in ERP5. Go back to
your empty script.
- Add the following:
portal = None

if portal is None:
  portal = context.getPortalObject()

portal_catalog = portal.portal_catalog

item_list = portal_catalog(
                            portal_type='Web Page',
                            sort_on=[('creation_date', 'descending')],
                            group_by=('reference'),
                            limit=[0,4]
                          )

return item_list or []
- Save
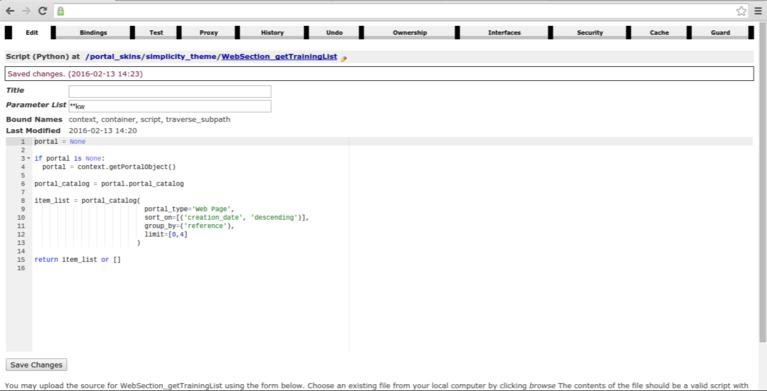
Note and make sure you don't forget to set the **kw in Parameter List
as the listbox will call the method you specify with a number of parameters - which we will
disregard in our case. Without the **kw specified however, ERP5 will throw an error.
Again let's assume you're familiar with basic Python and the way to query ERP5.
In our case we define the portal_catalog and then run a query for web pages.
We only return four items, so we can see a difference. Save the script.
First, we will add it to the listbox configuration.
- Go back to your portal_skin's
WebSection_viewCombinedTrainingDefaultWebPageAndContent form
- Open the listbox configuration
- Change the List Method to
WebSection_getTrainingList
- Save
We have now set our custom script to fetch the data we want. Refresh the web site
to see whether it worked.

It did, our custom method returned four items. It is still a fully functional listbox,
so if you would remove the Page Template, you would still get the
default listbox styling along with all functionalities.
As a last step, we will try to call our custom script from the Python script
itself.
- In the listbox configuration, switch the List Method back to
WebSection_getCachedDocumentValueList
- Save
- Head back to your page template
ListBox_viewAsTraining
- Change the definition and loop to:
<tal:block
  xmlns:tal="http://xml.zope.org/namespaces/tal"
  xmlns:metal="http://xml.zope.org/namespaces/metal"
  xmlns:i18n="http://xml.zope.org/namespaces/i18n"
  tal:define="field_id here/getId;
              selection_name here/getSelectionName;
              real_context here/getContext;
              real_context_title python: real_context.getTitle();
              real_context_list python: real_context.WebSection_getTrainingList();
              global is_gadget_mode request/is_gadget_mode | nothing;
              listbox_max_lines  python: int(here.getMaxLineNumber());
              total_line         python: int(here.total_size);
              need_pagination python: total_line > listbox_max_lines;
              page_navigation_template python: request.get('page_navigation_template', here.getPageNavigationTemplate());
              is_slider_mode python:  'Slider' in page_navigation_template;
              is_default_listbox_field python: field_id=='listbox';
              base_url_string real_context/absolute_url;">

<tal:block tal:repeat="render_result real_context_list">
    <tal:block tal:define="title python: render_result.getTitle();
                           url python: '%s/%s' % (base_url_string, render_result.getUrl());">
      <h3><a tal:attributes="href url" tal:content="title"/></h3>
    </tal:block>
</tal:block>
- Save
Note we are no longer using line_list. We have to mind the
context here, because the script is called from within the listbox so the
here parameter, which normally should be the web page or section will
in our case be the listboxRenderer. You can see this when trying to call
our script on here which will result in an error, because of calling an
unknown property. Instead we have to use real_context. To see what this is...
I just added a line of real_title python: real_context.getTitle()
and outputted it to the page (missing on the screenshot).
We can call our script from the real_context, so
real_context_list python: real_context.WebSection_getTrainingList();
will run our query. Note we also have to change the content output,
because we are no longer utilizing the renderer. Our method returns plain
objects which we can fetch properties from as done above.
If you know refresh the page, you will see everything is still running.
So it is possible to use the same script both from the listbox configuration
and the page template directly.
Summary
Quite a long HowTo, but it shows a lot of useful things. We have configured a listbox
to receive data from predicates, listbox configuration, page templates and direct
portal catalog queries going from plain setting in the UI to querying the catalog
by hand. This will give you all possibilities of creating custom listbox layouts
and should also help you in figuring out why things are displaying. Or not.
Related Articles